Introduction
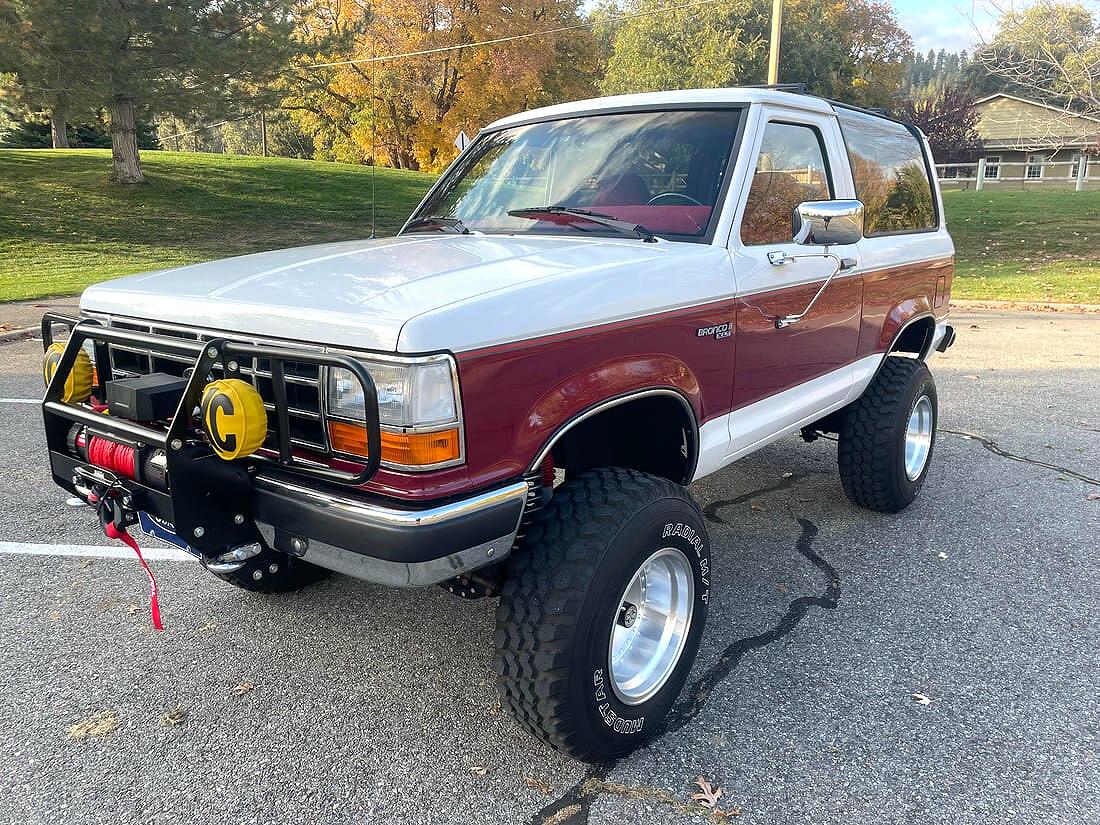
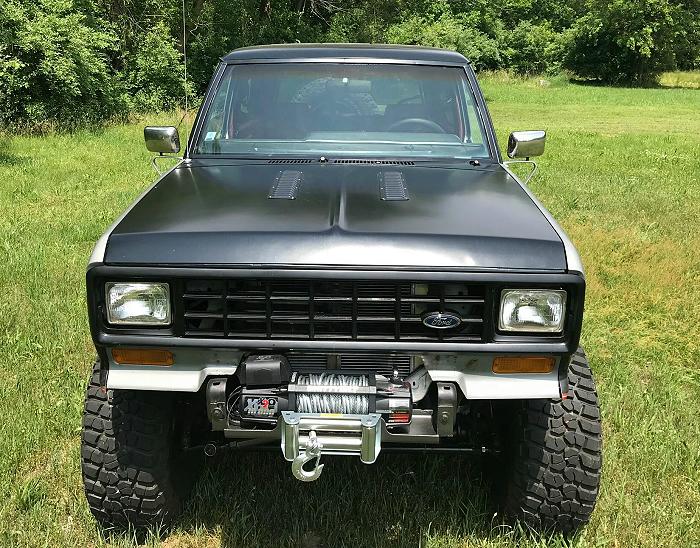
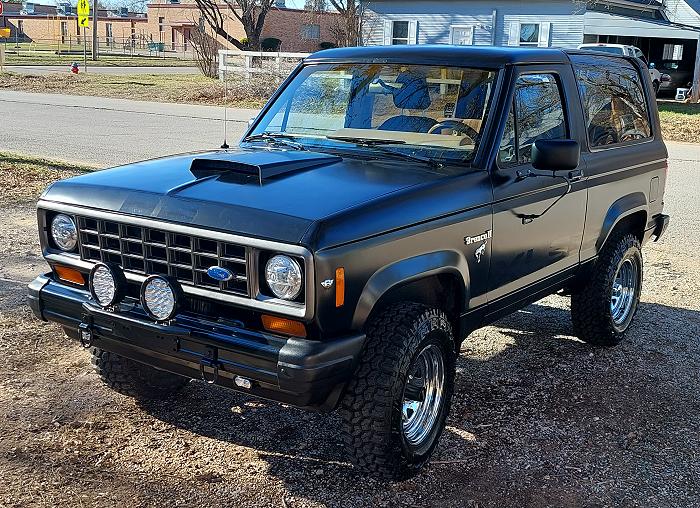
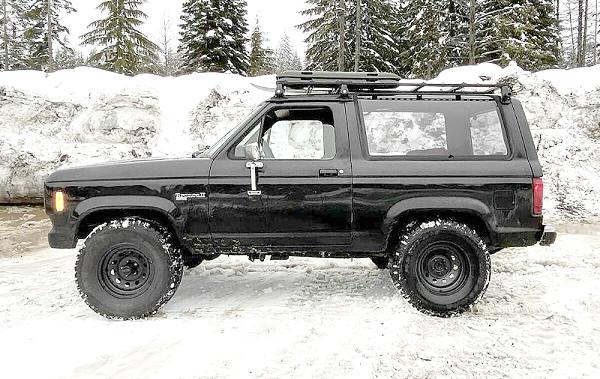
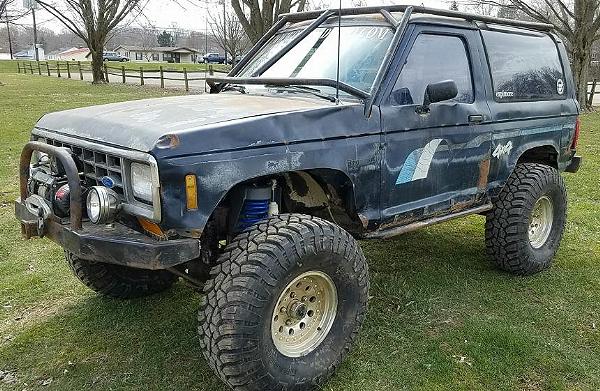
The Ford Bronco II was built from 1984-1990. Although it only had a 6-year run, there are still a lot of them left out there for sale. From time to time, you can even find them in pretty great condition like the one shown above. Since most people build Bronco II’s for off-roading and adventure travel, I’m going to focus this article on that.
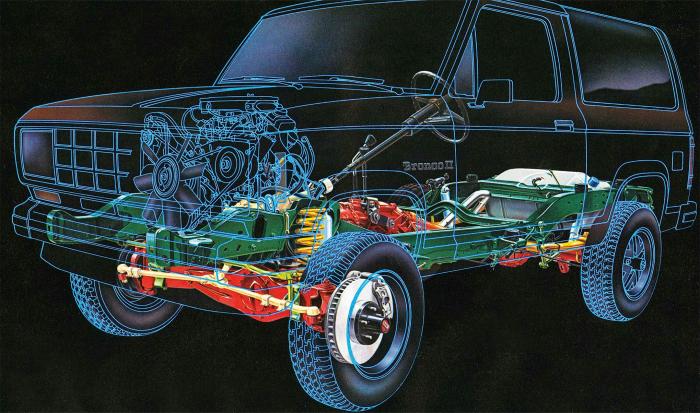
Ford Bronco II Mechanical Overview
2.8L Engine
The 1984-1985 Ford Bronco II came with a 2.8L 115 Horsepower V6 Engine. This is a pretty simple engine that uses a carburetor, but the TFI module has been known to be problematic when it gets to warm. The purpose of a TFI module is to control the spark output of the ignition system. A signal is sent from the TFI to the ECU, where the ECU processes the received signal and correspondingly outputs the correct spark control for engine timing (advance/retard). Many people have eliminated the TFI by doing to a Duraspark Ignition Conversion. If you plan to keep the stock ignition, you should Remote Mount The TFI Ignition Module. A unique feature about the 2.8L is that it uses a timing gear, instead of a timing chain that can stretch or break. These are actually very reliable engines. Aside from the TFI module, the only other issue with the 2.8L is that the rubber valve seals can start to leak, but a Ford 2.8L Valve Seal Replacement isn’t that difficult. Stroppe use to run 200 horsepower 2.8L’s in their Ford Ranger off-road race trucks. See: 200 Horsepower From Ford 2.8 Liter V6
See also: Ford Ranger / Bronco II 2.8L V6 Engines
2.9L Engine
The 1986-1990 Ford Bronco II came with a 2.9L 140 horsepower V6 engine. Unlike the earlier 2.8L, the 2.9L is fuel injected. The only real issue with these engines is that the cylinder heads were known to crack on the 1986-1988 models. The cylinder heads underwent a redesign for the 1989 model year, receiving additional material in problem areas, largely eliminating this specific failure. These head casts are commonly printed with the “89TM” designation. If you’re buying a 1986-1988 Ford Bronco II, you’ll want to check the engine oil for signs of engine coolant.
See: Ford Ranger / Bronco II 2.9L V-6 Engines
A4LD Automatic Transmission
The A4LD 4-speed automatic transmission went on to become the 4R44E, 4R55E, and finally the 5R55E. However, it had reliability issues from 1985-1987. Reliability began to improve in mid-1988 when Ford introduced the dual solenoid setup. Models from 1989 and later benefited from Ford’s broader engineering push to improve “Noise, Vibration, and Harshness” (NVH) and general durability, making them noticeably better than 1985–1987 models.
I generally recommend that people stay away from the 1985-1987 A4LD transmission. If you don’t want to replace it, you can extend its working lifespan using a few simple methods and modifications (this applies to the 1988-1990 models as well):
Place an aftermarket transmission cooler in the return line in addition to the factory cooler. It can help keep the transmission cool because too much heat buildup will destroy it. You should keep the temperature of the transmission below 200 degrees Fahrenheit maximum. Install a transmission temperature gauge to keep track of its temperature.
Add an A4LD valve body kit such as a Superior Shift Kit or a TransGo Shift Kit which adds pressure inside the valve assembly. When pressure increases, it keeps the clutch packs from separating, as well as keeping the clutches and associated bands from overheating.
For more A4LD information, check out: Ford Bronco II / Ranger A4LD Automatic Transmission
For more information on Ford Bronco II transmissions, check out: Ford Bronco II Transmissions
C5 Automatic Transmission
The 1984 Ford Bronco II came with a C5 medium-duty, three-speed automatic transmissions. The main difference between a C4 (not offered in the Bronco II) and a C5 was that the C5 had a lock-up clutch to improve gas mileage on the highway. The C4 was a case fill transmission with the dipstick in the case. The C5 employed a pan fill with the dipstick in the pan. This transmission is less prone to failure than the A4LD that replaced it. Some people have used the tail housing and output shaft from the 4×4 version of this transmission in a C4 so they could do a V8 swap.
For more information on Ford Bronco II transmissions, check out: Ford Bronco II Transmissions
Manual Transmissions
The Bronco II used the following manual transmissions over its production run from 1984 to 1990:
- Mazda TK4: A 4-speed manual transmission offered in the 1984 models.
- Mazda TK5: A 5-speed manual, introduced in 1985 as an upgrade from the 4-speed.
- Mazda M5OD-R1: A 5-speed manual overdrive transmission that appeared in later models.
- Mitsubishi FM145: A 5-speed manual used from around 1985-1987.
- Mitsubishi FM146: A 5-speed manual that succeeded the FM145, typically in models from 1988 onwards.
The 5-speed manual is going to have a lower gear and give you more torque off the line than the automatics, plus it gives you a 5th gear overdrive. Overall, the manual transmissions in the Bronco II are quite robust, particularly when compared to the problematic A4LD automatic transmission offered at the time. However, specific issues have been noted for certain models:
Mitsubishi FM145/FM146: These transmissions are known to have a design flaw where the reverse and 5th gear can go out due to an engineering defect. They also don’t handle abuse well and can have issues if filled with the incorrect fluid (they require gear oil, not ATF).
TK4/TK5: The TK4/TK5 shifter has a nylon (plastic?) ball at the base of the shifter that after all these years can crack, come apart, and cause the shifter to not engage the transmission. If your shifter isn’t engaged and spins, this is probably the problem. You can get a new replacement at: Ford TK5 Shifter Repair Parts Online
Durability: Many enthusiasts view manual transmissions as generally more robust than their automatic counterparts from that era due to less complexity and electronics.
The M5OD-R1 is generally considered a good transmission and is a popular swap option for those looking to replace the less durable FM145/146 units, as it is a similar length and compatible with the existing clutch hydraulics.
For more information on Ford Bronco II transmissions, check out: Ford Bronco II Transmissions
BW1350 & BW1354 Transfer Cases
The BW1350 has a splined front receiver where the front driveshaft slides in. The BW1354 has a yoke on the front that accepts a u-joint and holds it in place with straps. The BW1354 was only used in the Bronco II during the 1990 model year. The 1350 and 1354 are produced as a mechanical shift and electronic shift. These are both good transfer cases. Between the two, the BW1354 is the more desirable unit since it uses a front yoke and not the splined receiver. I have actually seen an axle drop down so far off-road that it pulled the front driveshaft slide out of a BW1350 transfer case.
BW1359 “Dummy” Transfer Case
From 1984-1990, Ford equipped 2WD models with a BorgWarner unit commonly identified as the BW1359. While it resembles a conventional 4WD transfer case externally, it is not a functional four-wheel-drive unit. Instead, the BW1359 is best described as a “dummy” or pass-through transfer case, used almost entirely for manufacturing efficiency and assembly-line standardization.
In 1990, the final year of Bronco II production, Ford began transitioning some 2WD models away from the BW1359 entirely. Ford accomplished this by using an adapter that slid onto the output shaft of the 2WD transmission. This adapter featured a four-bolt flange, allowing the rear driveshaft to bolt directly to the transmission.
The fact that the Bronco II came with a 4WD transmission and “dummy” transfer case makes it fairly easy to convert to a true 4WD.
For more information check out:
2WD to 4WD Conversion (Overview)
Converting Your Bronco II From 2WD To 4WD (Detailed)
2WD Dummy Case to 4WD Transfer Case
Ford Bronco II Engine Swaps
Ford 4.0L V6 Swap
The Ford 4.0L OHV out of a Ford Ranger or Ford Explorer has been a popular swap in Ford Bronco II’s. This engine produces 160 horsepower and 220 ft-lbs of torque. If you swap in the engine, transmission, and harness from a 1995-1997 Ford Ranger, you will benefit from the stronger 4R55E automatic transmission.
Ford Rangers used the 60-wire EEC-IV computer thru 1994 (OBD-I). 1995 and up used the 104-wire EEC-V computers (OBD-II). The EEC-V computers (1995+) need a rear O2 sensor after the catalytic converter. So, the added wiring is the reason you would look for a donor that uses EEC-IV (1990-1994) wiring and harness. It’s a simpler swap wiring-wise. The EEC-V is certainly doable, but only to 1997. After that you have PATS (Passive Anti-Theft System) to deal with, and speedometer issues.
The 1998-2000 4.0L Ford Rangers came with a 5R55E automatic transmission.
PATS started in 1998 in Ford Explorers and 1999 in V6 Rangers. All Rangers and Explorer lost speedometer cable hook up by 1998, even on transfer cases.
For more information check out:
4.0L Conversion On Older V-6 Fords
4.0 Conversion Wiring (From Explorer to Bronco II)
4.0L Conversion (1994 Explorer to 1989 Bronco II)
Wiring a 4.0L to a 1983-1988 Dash
Ford 302 / 5.0L V8 Swap
This is another popular engine swap that’s been done on numerous occasions. These swaps typically involve a Ford 5.0L from a 1996-2001 Ford Explorer.
For information on wiring the 5.0l to your Ford Bronco II, check out “2.9L to 5.0L Engine Wiring“.
When using an automatic transmission and 4WD, you’ll need to get a new tailhousing and output shaft to adapt a Ford C4 or AOD to accept the Bronco II’s BW1350 transfer case or get a C4 automatic from an early Ford Bronco 4×4 with a Dana 20 transfer case.
Ford more information on V8 swaps check out:
1986 2.9L To 5.0L Engine Wiring
V8 Swaps: 1983-1997 Ford Ranger / Bronco II’s)
Advance Adapters Engine Swap Information
Ford 5.0 Wiring (2.8 – 5.0 Swap)
Ford Bronco II Suspension & Axles
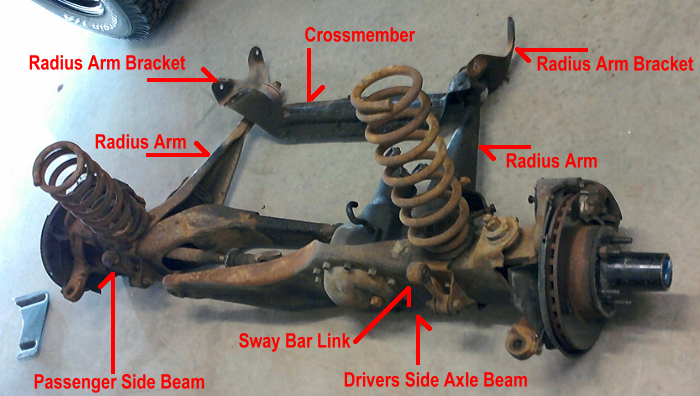
Twin Traction Beam (TTB) Front Suspension
The TTB is an independent front suspension in the sense that each side of the front vehicle has its own axle beam, coil spring, and radius arm. The TTB came as either a Dana 28 (1984-1989) or Dana 35 (1990). Both were reverse rotation differentials.
The photo below shows the 4WD Bronco II front suspension, and the driver and passenger TTB axle beam. The end of the beam has a bushing in it, and bolts into a suspension bracket on the trucks frame. This allows the axle beams to pivot independent of each other.
Check out: 1983–1997 Ford Ranger TTB Suspension Modification Guide
Dana 28 TTB Axle
The Dana 28 had a small 6.625-inch diameter ring gear, and small 1.00-inch and 23-spline axle shafts. It also used small 456x u-joints. This axle was offered from 1984-1989. MileMarker (427) and AVM (467) still make manual locking hubs for it, and Bronco Graveyard offers Chromoly axle shafts. This axle will be fine if you’re just building a light off-roader and don’t plan on using a tire larger than 31-inches. You should replace the Dana 28 with a Dana 35 if you plan on building your Bronco II for off-road and larger tires.
For more information check out:
Dana 28 / 35 TTB Axles (1983-1997)
Dana 35 TTB Axle
The Dana 35 had a larger 7.56-inch diameter ring gear, and larger 1.16-inch and 27-spline axles shafts. This axle used larger 297x (stock), 760x u-joints. This axle was only available on the 1990 model year, and only on Bronco II’s built in November 1989 and later. The Dana 35 is a great axle and can handle up to a 35-inch tire. There is still good aftermarket support including gears and lockers, and AVM offers an Xtreme Performance Hub that is far superior to the stock hub. Want stronger hubs and better wheel bearing spacing for your Dana 35? Give it a Dana 44 Knuckle & Manual Hub Swap.
For more information check out:
Dana 28 / 35 TTB Axles (1983-1997)
Ford 7.5-Inch Axle
All Ford Bronco II’s came with a 28-spline Ford 7.5-Inch axle. (the name reflects the ring gear diameter) This axe will easily handle a 31-inch tire, and you can still get gears and a Lock-Right Locker (1830-LR) or Eaton Grip-N-Loc Limited-Slip (546023) for it. The 7.5 can handle a 33-inch tire, but if you’re building a Bronco II to be a moderate to more dedicated off-roader, I’d switch to a Ford 8.8-inch axle.
For more information check out:
Ford 7.5-Inch Rear Axle History & Specs
Ford Bronco II Axle Upgrade / Swaps
Dana 35 Front Axle
If you don’t have a 1990 Ford Bronco II with the Dana 35, then you should seriously consider upgrading your stock Dana 28 to this axle. The Dana 28 can really only handle a 31-inch tire, and the axle no longer has aftermarket support if you’re looking to re-gear it or add a locker such as a Lock-Right (2310 or 2311) or Auburn Select-A-Loc (545013). The Dana 35 is pretty strong axle and can handle up to a 35-inch tire, but its weak link has been the narrow wheel bearing spacing on its spindle, and the flange style locking hubs. For many years, Dana 35 owners use to upgrade to the stronger Warn 37780 ‘Jeep’ Hub but Warn has stopped producing it. Today, the heavy-duty manual hub option is the AVM Xtreme Performance Hubs For The Dana 35. If you want stronger hubs and better wheel bearing spacing, you can give it a Dana 44 Knuckle & Manual Hub Swap.
When Ford engineers first tested the Bronco II, they suggested that the axle be widened 2-inches to make the vehicle more stable. Ford produced it anyway. When Ford produced the Dana 35, they made it 2-inches wider than the Dana 28. So not only is the Dana 35 a stronger axle, but it’s also wider to add to the vehicle’s stability.
Dana 44 Front Axle
If you plan on going with a tire taller than 35-inches, you’ll need to switch to a larger axle. Many people have switched to a 1971-1977 Ford Bronco Dana 44. I’ve never been a big advocate of these swaps because these early Dana 44’s had small 260x u-joints. Smaller than Dana 35 U-joints. James Duff makes swapping one of these axles into your Bronco II easier, but you may want to consider a stronger Dana 44 from a full-size Ford truck. If you choose the early Bronco axle, there are companies that make replacement axles that use larger U-joints.
There are more Dana 44 options than just the Early Bronco Dana 44. There’s the:
- Full Width Dana 44
- Dana 44 TTB
- Dana 44 Spindles & Hubs on A Dana 35
I wouldn’t use anything larger than a 37-inch tire on a Dana 44. If you plan on going larger than that, you should be looking at Dana 60’s.
For more information on your Dana 44 options, check out:
Dana 44 Guide For Ford Ranger / Bronco II
Ford 8.8-Inch Rear Axle
The Ford 7.5-inch rear can handle a 33-inch tire. I’ve even seen them running 35’s, but I personally wouldn’t go that big. If you’re serious about building an off-road capable Ford Bronco II, you should swap out the Ford 7.5 rear axle for a 31-spline 8.8-inch axle. The Ford Ranger came with a 28-spline Ford 8.8-inch axle starting with the 1990 4.0L trucks. When the FX4 Ford Ranger was introduced in 2002, it came with the 31-spline 8.8-inch axle. The 1990-2001 Ford Explorers also came with the 31-spline 8.8-inch axles, and the 1995-2001 models came with disc brakes. Not all FX4 Ford Rangers had 31-spline axles though. Only the ones fitted with a Torsen differential. You will have all kinds of aftermarket options available with the 31-spline 8.8’s.
The added benefit to using a Ford Explorer 8.8-inch axle is:
- 31-spline axle shafts
- Disc brakes (1995-2001)
- 1.12″ wider than the Ranger 8.8
For more information on the Ford 8.8-inch ale, check out:
Ford 8.8-Inch Rear Axle History & Specs
Ford Bronco II Suspensions Lifts, Body Lifts, and Fender Flares
Suspension Lifts
A suspension lift will not only make room for larger tires, but it also moves the frame and drivetrain higher up from the ground. This will provide more ground clearance off-road, but only tire size will affect how much room is between the axles and the ground.
Lifting your Bronco II will affect its center of gravity. Ideally, you always want to keep your center of gravity as low as possible. A higher center of gravity will have a negative effect on how your Bronco II handles and increase the chance of a rollover when you’re navigating steep angles.
Choosing A Suspension Lift
There are only (2) manufacturers that I would recommend when it comes to lifting your Ford Bronco II:
Skyjacker
Skyjacker offers 4 & 6 inch Class I and Class II kits. The Class II kits come with longer radius arms which not only allow 30% more wheel travel but also help to improve the ride. Skyjacker makes the strongest bolt on suspension brackets out there and is my preferred brand because of the build quality. Skyjacker also offers rear leaf springs as well.
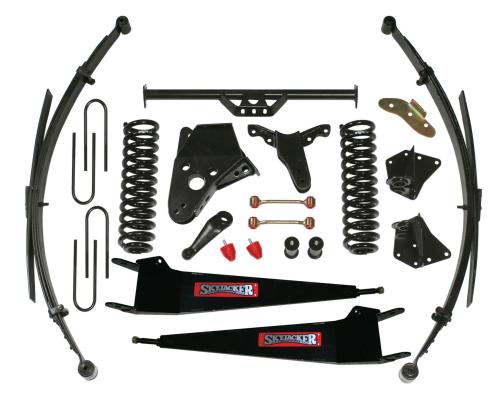
Link: www.skyjacker.com
James Duff
James Duff offers a 3-inch Stage one kit, and a 5-6 inch Stage 3 kit. The sage 3 kit comes with longer radius arms for improved wheel articulation (wheel travel). From what I can see, it looks like James Duff is no longer offering a complete lift kit, but some of their components are still available.
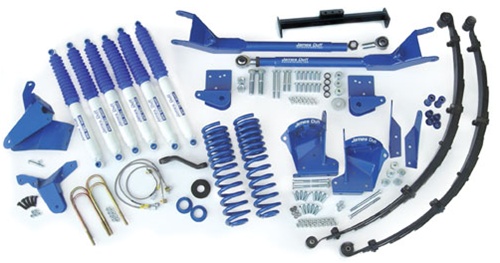
Link: www.dufftuff.com
Rough Country
Rough Country offers a 4-inch lift kit for the Ford Bronco II as well as replacement rear springs. Rough Country started out as a suspension company and today offers pretty much every product you could need to build your Bronco II into an off-road or adventure vehicle. My only issue with a Rough Country lift is that is uses a metal plate to drop the passenger side axle beam pivot bracket instead of providing a complete replacement bracket like Skyjacker and James Duff.
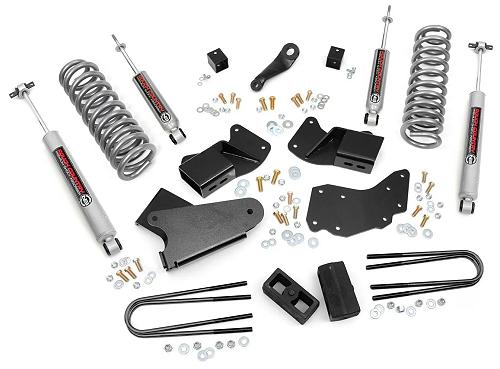
Link: RoughCountry.com
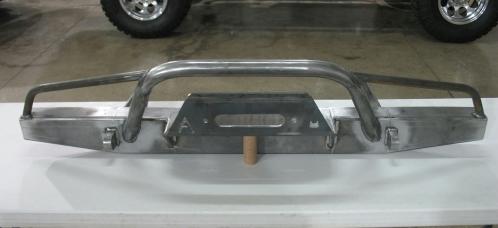
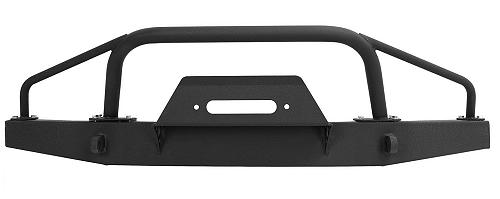
Beware of Suspension Drop Brackets
This is one of those topics that I think is overlooked and needs mentioning. People will buy a cheap lift kit to save money, or piece together their own lift with used parts. I strongly suggest you stay away from lift kits or suspension brackets that use a drop plate for the passenger beam pivot bracket.
Here’s why:
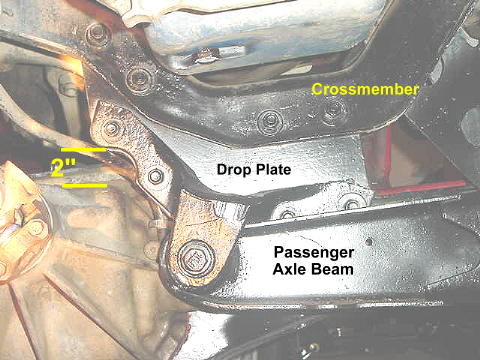
Looking at the back side of this lift, you can see where the pivot bracket for the passenger side beam has been lowered by using a drop plate. If you look to the left, you can see where there is only 2-inches of space between the bracket and the front differential. There is a risk that upward suspension travel could cause the differential to strike the plate and bracket and break the differential housing.
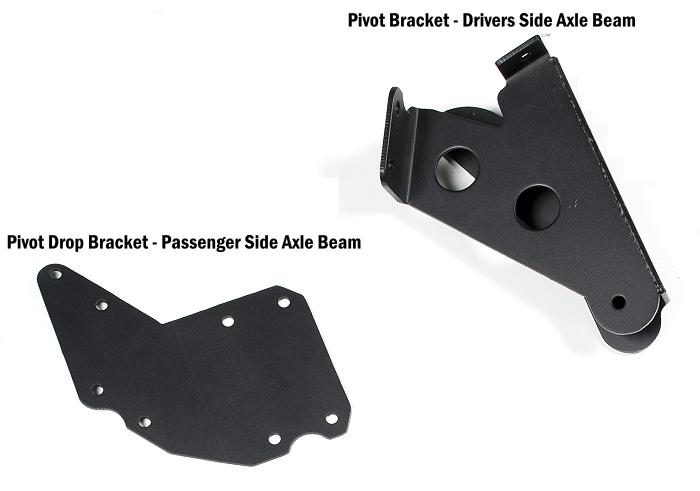
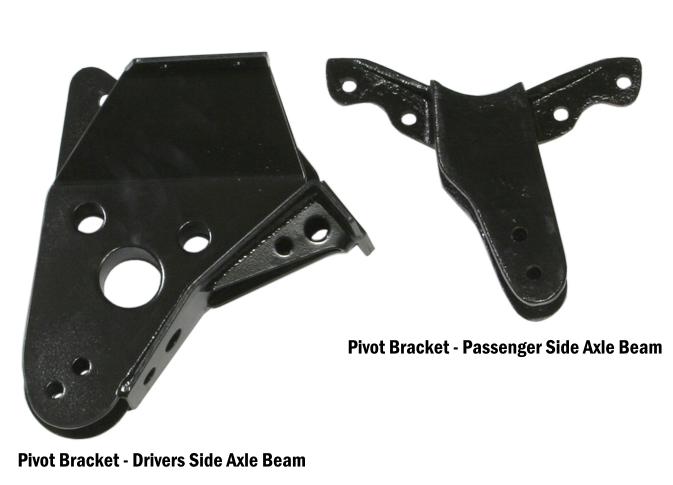
The photo above shows lift kit brackets that use the drop plate method. The photo below shows heavy duty Skyjacker brackets that includes a complete replacement passenger beam pivot bracket. In my opinion, the brackets above lift your truck to make it look cool, and the brackets below is for the person that actually wants their truck to handle the abuse of off-road. Just look at how much more support the driver’s axle beam bracket has!
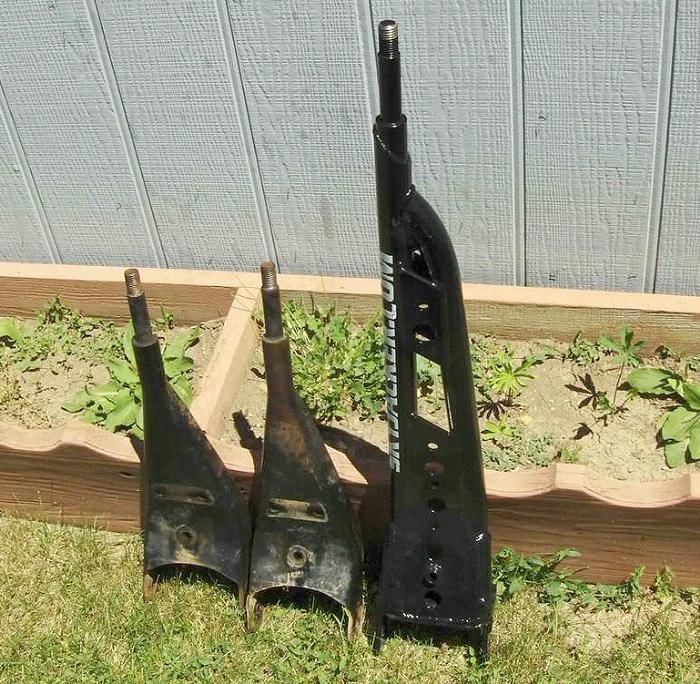
Extended Radius Arms
Extended radius arms for Ford Ranger TTB suspensions are one of the most effective upgrades for improving off-road performance, suspension travel, and handling. By replacing the stock radius arms with longer aftermarket or custom-built arms, you can increase wheel travel, maintain better tire contact, and reduce pinion and caster angle changes on lifted or modified Bronco II’s.
Check out: Ford Ranger / Bronco II TTB Extended Radius Arms
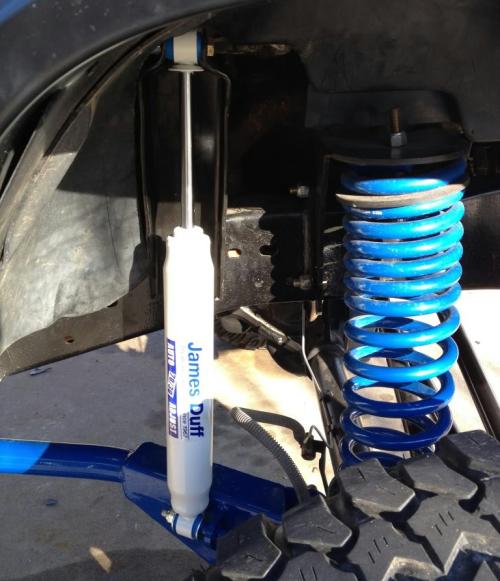
Taller Shock Mounts
Extended radius arms benefit from longer shocks to maximize the wheel travel. You don’t want your shock acting as your limiting strap.
Check out: Maximizing Your Ford Ranger Suspension Travel
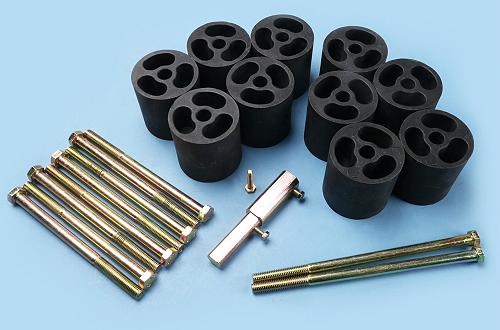
Body Lift
A body lift is a 2-inch or 3-inch spacer (3-inch is most common) that is bolted between the frame, and the body mounts. This will lift the body and help make room for larger tires. It’s much cheaper than a suspension lift, and since the frame and drivetrain have not been raised, it doesn’t increase your center of gravity as much as a suspension lift would.
Body lifts really come in handy when trying to make room for a V8 swap.
Performance Accessories was the only company that I’m aware of that made body lifts for the Ford Bronco II, but they no longer offer them. Daystar offers a 1-inch universal body lift kit, and I was pretty sure there were no other options, but then I came across a seller on Ebay that is selling 1984-1988 Ford Bronco II 3″ Full Body Lift Kit Front Rear 2WD 4WD.
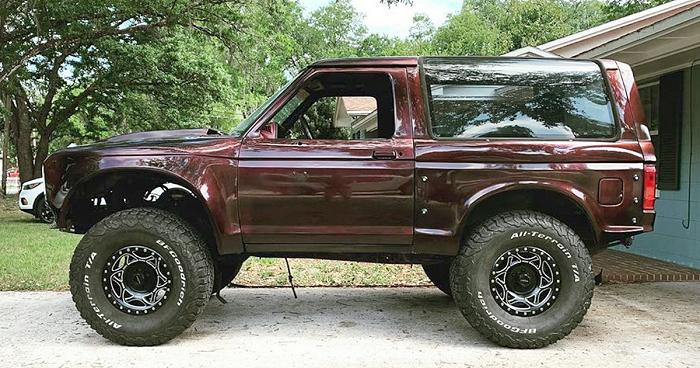
Cut Fenders / Fender Flares / Fiberglass Fenders
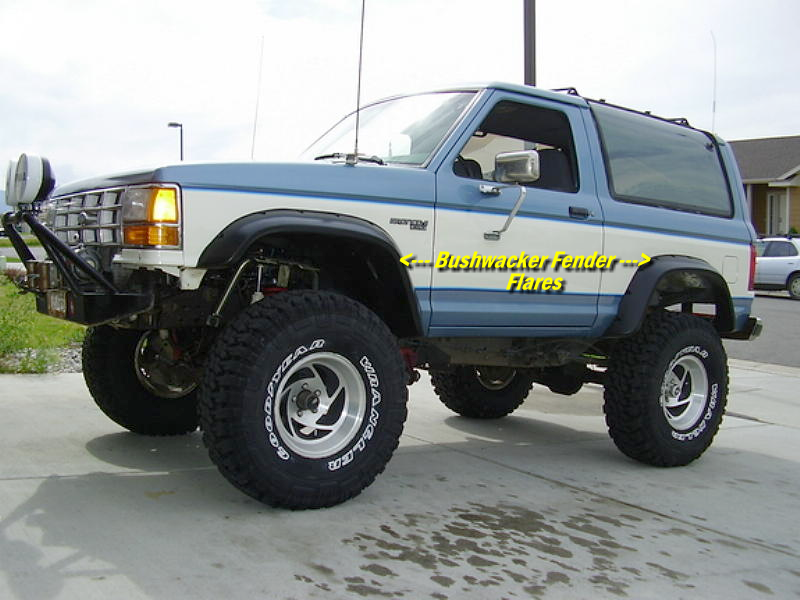
The small wheel openings are one of the biggest obstacles to adding larger tires to a Ford Bronco II. Some people cut the fender openings larger to allow for larger tires. Bushwacker makes a cut-out fender flare to allow a larger and wider tire. They offer front and rear sets for the 1989-1990 Bronco II, but only the rear set for the 1984-1988 Bronco II. You can use the 1989-1990 front set (1989-1992 Ranger) on a 1984-1988 as long as you’re willing to trim off the bottom front of the front fender to match the 1989-1990 styling. Others cut the fender opening to the size they need and use Pacer Flexy Flares to cover the cut edges of the fender.
Another option is to replace your front fenders and rear quarter panels with fiberglass fenders and panels from McNeil Racing. The McNeil fenders and panels will easily fit a 35-inch tire and provide additional width to cover the wider tire.
Some people use a combination of suspension lift, body lift, AND cut fenders.
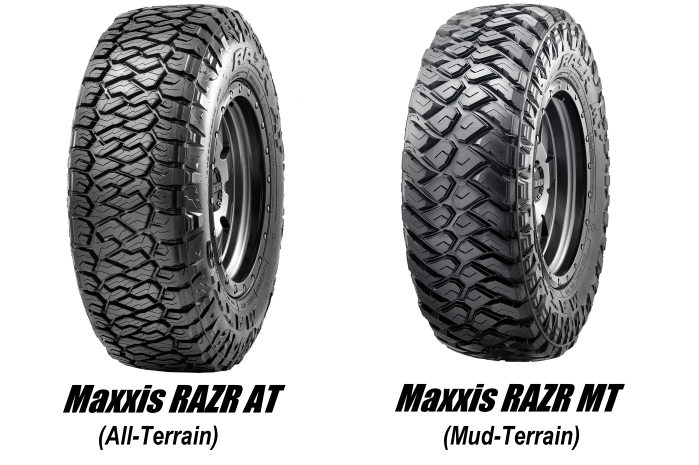
Tire Selection
Choosing the right off-road tire for a Ford Ranger depends on how often you drive off-road, the terrain you encounter, and how much on-road comfort you want to keep. Most off-road tires fall into three categories: All-Terrain (A/T), Rugged-Terrain (R/T), and Mud-Terrain (M/T).
- All-Terrain tires are ideal for Rangers that see daily driving with occasional trail use. They balance traction, tread life, noise, and wet-weather performance.
- Rugged-Terrain tires bridge the gap between A/T and M/T tires, offering stronger sidewalls and more aggressive tread without the full downsides of a mud tire.
- Mud-Terrain tires are best for deep mud, loose soil, and extreme off-road conditions but come with increased noise, reduced fuel economy, and faster wear on pavement.
The best off-road tire for your Ranger is the one that matches your real-world use, not the most aggressive tread pattern.
Check out: Choosing An Off-Road Tire For Your Ford Bronco II / Ranger
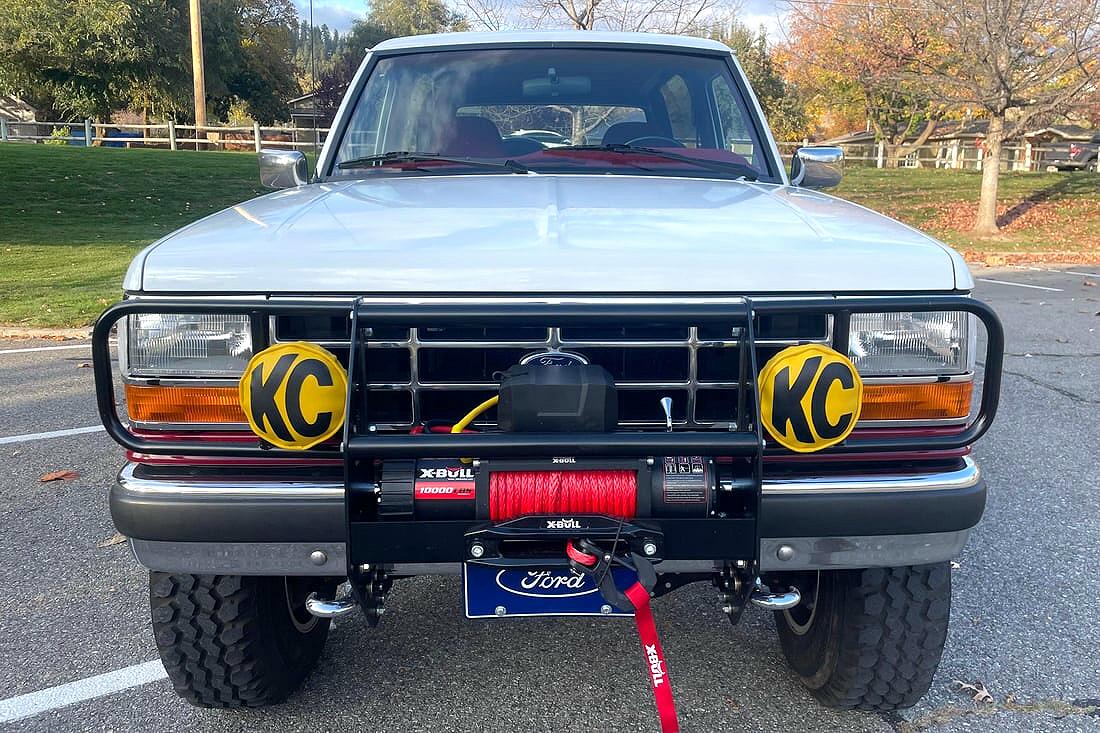
Winch & Recovery Kits
Winch
A winch is a great tool to have on your Bronco II if you plan to do much off-roading. Even on a hunting trip or camping adventure you could find yourself stuck and needing a winch to free yourself.
The industry standard rule of thumb for selecting a vehicle recovery winch is to get one with a capacity that is at least 1.5 times the vehicle’s Gross Vehicle Weight. The GVW includes the weight of the vehicle, a full tank of gas, passengers, and all cargo/accessories. The gross vehicle weight of a Ford Bronco II typically ranges from approximately 4,180 pounds to over 5,000 pounds, depending on the specific model year, engine, and installed options.
A 5,000 lb. Bronco II x 1.5 = 7,500. Winches typically come in sizes suck as 6,000, 8,000, 9,500, 10,000 and 12,000 (or 8K, 9.5K, 10K, and 12K). So, for a Bronco II, you would need a winch rated for at least 8,000 lbs.
Today there are some many companies offering electric winch that you can find some really good deals. Smittybilt and X-Bull are quality and affordable winches and usually have deals on 9,000-10,000-pound winches for under $400. Expect to pay $600 and more for a Warn winch. Warn is worth the money if you have the money to spend and your rig is going to see a lot of winching duty. But if it may only need to pull you out a couple times a year, I’d go with the Smittybilt or X-bull.
Don’t forget to get a winch recovery kit to go with your winch.
Check out: Choosing A Winch
Steel Cable or Synthetic Rope
For most off-road enthusiasts and weekend warriors using a winch for personal vehicle recovery, the safety and ease-of-use benefits of synthetic rope make it the superior choice, despite the higher initial cost and need for proper care.
If you work in a highly abrasive industrial environment or need a rugged, budget-friendly option where weight and handling are less of a concern, steel cable remains a viable, albeit less safe, alternative.
Winch Bumper
If you get a winch, you’re going to need something to mount it to. James Duff used to offer bumpers, but I no longer see them listed. There isn’t much option for buying one. Affordable Offroad offers the winch bumper below starting around $500 and is going to be the best quality made in America built bumper that you’re going to find.
There’s a company called KUAFU that offers the bumper below on Amazon for under $400.
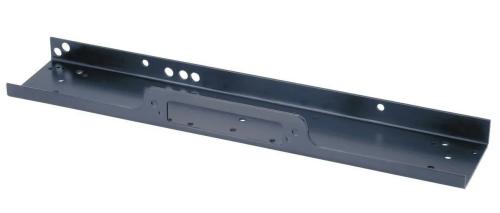
You can go to your local Harbor Freight and get a winch plate (channel) for around $50.
Some people have bought mounts like this, cut it to fit between their frame rails, and bolted it in place.
The reality is that most people build their own bumpers. If you don’t know how to weld or you’re not willing to try, hopefully you have a friend that does.
Off-Road Lighting
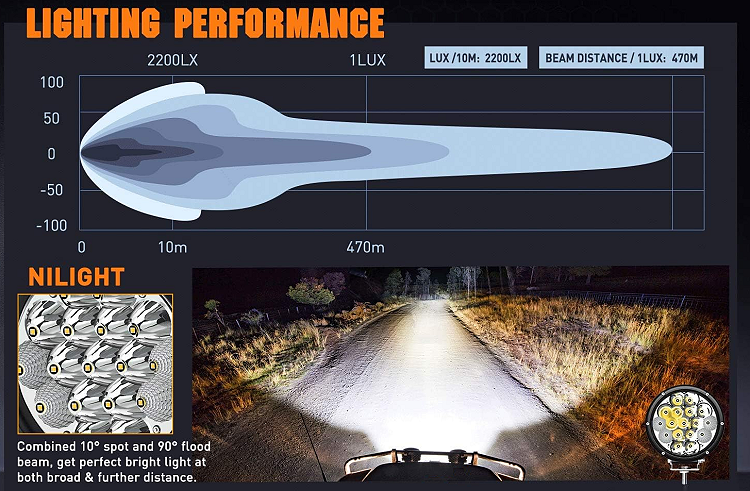
If you wheel at night, then the need for off-road lighting is obvious. For others, sometimes you can find yourself still on a trail after the sun sets even though you hadn’t planned on it. This is when you find out just how inadequate your factory lights really are. A good set of off-road lights should light up the trail well ahead of you, as well as the areas off to the sides. For those that live out in the country, you now that good lighting helps you see deer before you’re right on top of them.
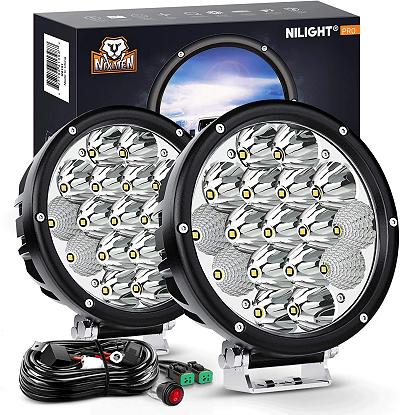
Back in the days of halogen lights, off roaders use to like to combine a KC spot ad a KC flood to see far and wide. With today’s LED technology, you can buy off-road lights that are a spot/flood combination. In the image below, you can see how this LED light with a 10° spot and 90° flood beam projects light down the road as well as off to the side.
Resist the urge to install ‘Ditch Lights’. These are the small lights that people mount up buy the base of their windshield posts. These will glare off of your hood and become annoying. Also resist the urge to mount lights over your windshield. These again will glare off of your hood and make noise (usually whistling) as your driving down the road.
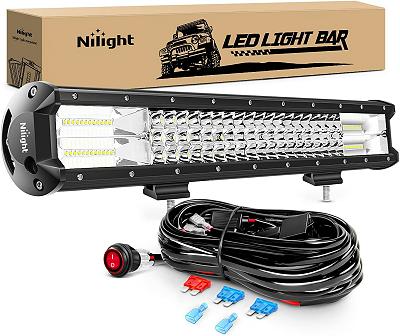
Instead, either mount (2) 6-inch or 7-inch LED lights or a 20-inch LED or 22-inch LED Lightbar on the front of your Bronco II.
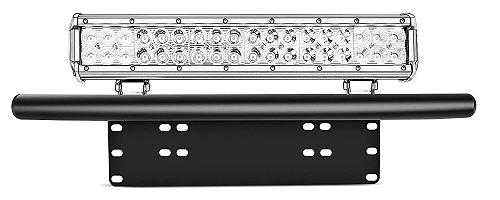
If you’re not adding a winch bumper and want a way to easily add lights to your stock front bumper, consider a License Plate Lightbar Mount like the one below that I used on the B2 Marauder Bronco II project.
Ford Bronco II Build Suggestions
Budget Build Light Off-Roader
- 1.5-inch Leveling Coils
- 1.5-Inch Add-a-Leaf
- 31-Inch Tires
- Trim Fenders Where Needed
Mild Off-Road Build
- 4-Inch Suspension Lift
- 31-Inch Tires
- Lock-Right Locker In Rear Axle
Moderate Off-Roader
- 4-Inch Suspension Lift
- Extended Radius Arms
- Dana 35 TTB Swap
- 31-Inch or 33-Inch Tires
- Trim Fenders
- 9.5K Winch
Serious Wheeler
- 4.0L V6 Swap
- 6-Inch Suspension Lift
- Extended Radius Arms
- Dana 35 TTB Swap
- Ford 8.8-Inch Axle
- 33×12.50×15 Tires
- Front & Rear Lockers
- Winch Bumper With 9.5K Winch
Jeeps Are For Girls!
- 4.0L or 5.0L Swap
- T-Case Doubler (Optional)
- Dana 44 Solid Axle Swap
- Ford 8.8 or 9-Inch Rear Axle
- Front & Rear Lockers
- 35-Inch Tires
- Winch Bumper With 10K + Winch
- Rock Sliders
Bronco II Crawler
- Ford Explorer 5.0L V8 Swap
- 4R70W Transmission
- BW4406 Transfer Case or NP205 Doubler
- Dana 60 Front & Rear Axles
- 37-Inch Tires
- Front & Rear Lockers
- Winch Bumper & 10K + Winch
Other Articles
Ford Bronco II Common Upgrades
About The Author
Jim Oaks is a longtime Ford truck and SUV enthusiast and the founder of The Ranger Station and Bronco II Corral. With decades of hands-on experience, he writes both technical and non-technical articles covering the Ford Bronco II, including mechanical systems, factory engineering, common upgrades, and detailed feature vehicle write-ups.
In addition to technical content, Jim documents Bronco II history, rare factory and aftermarket models, production details, and original Ford marketing materials. His work is based on firsthand experience, original documentation, and long-term involvement in the Ford enthusiast community.
Through his sites, Jim has built comprehensive reference libraries that serve owners, builders, restorers, collectors, and historians, helping preserve the Bronco II’s technical knowledge and historical significance.