Can You Overland a Ford Bronco II? How to Do It Safely
The Ford Bronco II is a “mountain goat”—nimble, short-wheelbase, and capable of squeezing through trails where full-size trucks fear to tread. However, it’s a vehicle with a documented history of stability issues. While it can make a fantastic overlanding platform, it requires a “less is more” philosophy to stay safe. If you’re planning to build a Bronco II for overlanding, here’s how to balance the “Overland Look” with real-world physics.
NOTICE: The photos on this page are for visual reference to help you visualize what I’m trying to say. The are not an attack on the vehicle owners or the vehicles themselves. The owners of these vehicles know the abilities and limits of their vehicles and drive them accordingly.
What is Overlanding
Today “overlanding” is typically defined as ‘self-reliant travel to remote destinations where the journey is the principal goal. Typically, but not exclusively, it is accomplished with mechanized off-road-capable transport (from bicycles to trucks) where the principal form of lodging is camping, often lasting for extended lengths of time (months to years) and spanning international boundaries.’
I see it like this:
Off-Roader: If you go to a specific area and spend the day or weekend off-roading that area, you’re an ‘Off-roader’.
Overlander: If you like to go off-road, explore, and camp in a different area each night along your journey and be self-sufficient, then you’re an ‘Overlander’.
I think the difference between camping and overlanding is that people generally go to a specific area, set up camp, and stay in that area when camping, whereas overlanders travel and cover a lot of distance spending most of their time off pavement and camp along the way.
The Elephant In The Room
If you’re not aware of the Ford Bronco II history, it was plagued with rollovers and lawsuits. It was estimated that 260 people had died in Bronco II rollover crashes, a rate that is several times more than in any similar vehicle according to the Insurance Institute for Highway Safety. By 1995, Ford had paid $113 million to settle 334 injury and wrongful death lawsuits. A class-action settlement with owners of its controversial Bronco II provided “new safety warnings and up to $200 for repairs and modifications.” Ford ended production of the Bronco II in 1990, but “always contended that rollovers are overwhelmingly caused by bad driving or unsafe modifications to the vehicle.”
Ford ignored its engineers’ recommendations to widen the track of the SUV and lower the center of gravity. In the spring of 1982, Ford engineers recommended that a 3 to 4 inch widening of the vehicle track, would produce a “major improvement” in “roll characteristics.” While these improvements didn’t make their way into the Bronco II, they did make it into the Ford Explorer that replaced it.
Even though the Bronco II had this ugly history, the Bronco II became a popular vehicle with off-roaders. Adding wider and heavier tires or widening the track may help the stability on the road, but it doesn’t fully fix the issue. The Bronco II has its own unique handling characteristics. They are very prone to lifting a tire while climbing an obstacle, and I’ve seen them tip over on their side during off camber situations. These situations can be controlled by understanding your Bronco II, its abilities, limitations, and how to properly drive off-road.
(Bronco II lifting a tire while off-camber from all of the weight on it)
Center of Gravity and Its Impact on Overlanding
The center of gravity (CG) is the single point where a vehicle’s total weight is considered to be concentrated. It’s the balance point in three dimensions — front-to-back, side-to-side, and height above the ground. A low, central CG improves stability, while a high or unevenly distributed CG increases the risk of tipping, especially on uneven or off-camber terrain.
A suspension or body lift will raise the vehicle, raise its center of gravity, and increase its chances of rolling over in off camber situations.
For more information on center of gravity, check out Center of Gravity
Mounting / Loading Weight High on The Vehicle
Maintaining a low CG is essential for stability on uneven terrain. On a narrow vehicle like the Bronco II, managing where you put your weight is the difference between a fun trip and a “flop” on its side.
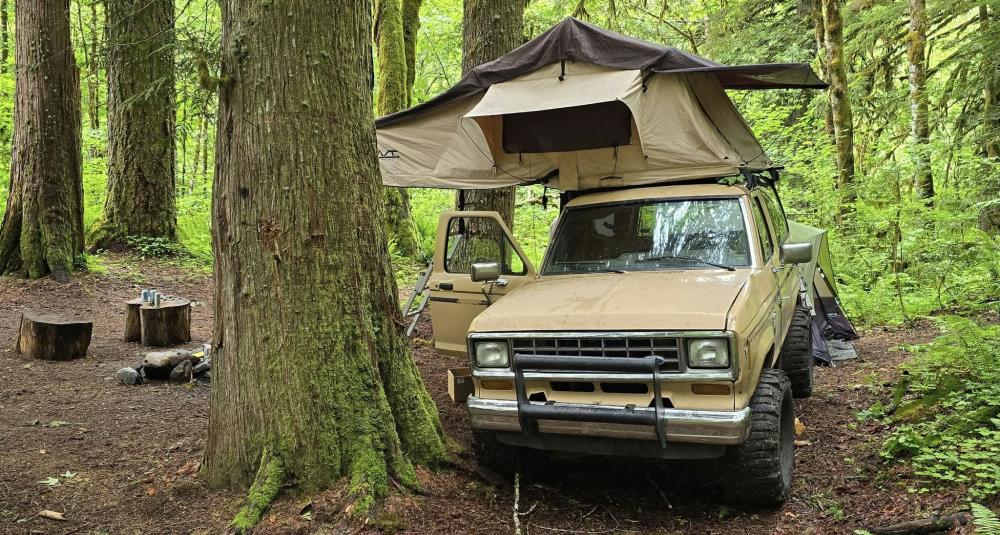
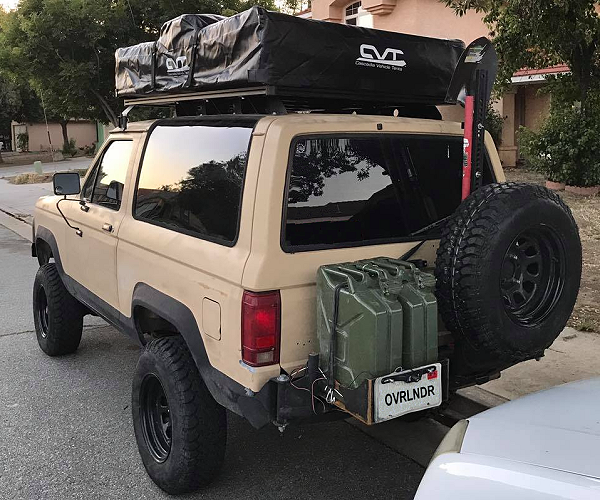
1. Roof Top Tent
Placing 150+ lbs. on a roof that is already nearly six feet off the ground drastically raises your CG. Even a slight off-camber lean on a trail can become a point of no return and flop the vehicle onto its side. On the highway, an RTT acts like a sail. In a crosswind or emergency swerve, that top-heavy weight generates massive “body roll,” making it nearly impossible to regain control once the vehicle starts to lean.
2. Keep It Low: The “Between the Frame Rails” Rule
Ideally you should store heavy items like water jugs, toolkits, and recovery gear on the floorboard behind the front seats. More than likely you have the rear seats folded down for more storage. If that’s the case, keep your heavier items like your cooler or fridge ahead of the wheels behind the front seat. You should also find a way to secure them, so they don’t become dangerous projects in a crash.
3. Water & Gas
5-gallons of water weights 41.7 lbs. and 5-gallons of gas weighs 31.5 lbs. Keep that in mind if you feel the need to carry water and extra fuel. Do not carry the fuel inside on the vehicle.
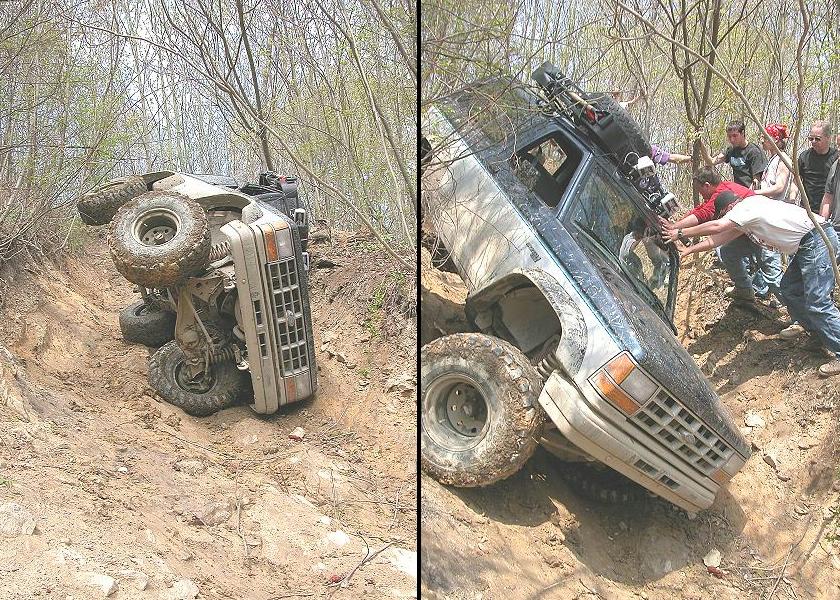
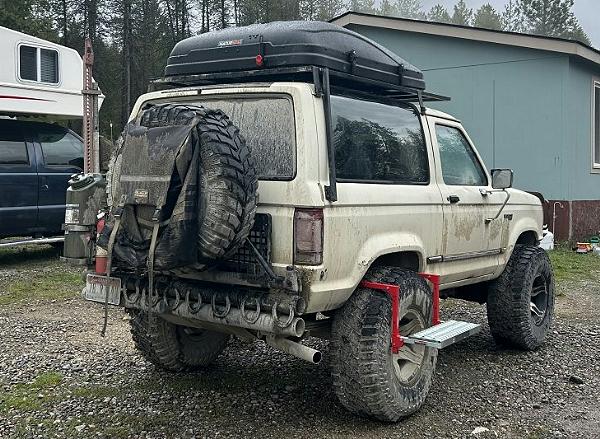
4. Example
Below you can see a Bronco II that rolled over and a group of people trying to roll it back onto its wheels. This Bronco II had a roof rack with some gear and a spare tire mounted on it which raised its center of gravity. You can see that the trail doesn’t look that extreme, but when the Bronco II got too far to its right and off camber, the added weight on the roof likely contributed to its roll over.
Mounting Weight Above The Rear Bumper
Swing out tire carriers with full size spare tires, a high light jack, and 5-gallon cans of gas or water look ‘cool’, but they are not a good idea on a short wheelbase vehicle.
1. The Pendulum Effect: High-Speed Handling
Adding all of this weight behind the rear axle and above the frame rail creates a pendulum effect. In a sudden lane change or emergency maneuver, that weight wants to keep moving in the direction it was traveling. Because the Bronco II already has a high center of gravity and narrow track, this extra weight and momentum want to push the vehicle over. If you pushed on the side windows of your Bronco II, you could probably rock it back and forth with little effort. Now imagine making a hard left turn where the weight of the vehicle shifts and it leans to the right, and a 250-300 lb. person coming up and shoving on your left rear side window at the same time and pushing it over.
2. The Lever Effect: Steep Climbs & “The Flop”
On the trail, weight behind the rear axle acts as a lever. And again, having the weight above the frame ads to the leverage. Imagine a seesaw. If you sit directly over the center, nothing happens. If you sit on the very end of the board, your weight has leverage.
When you’re going uphill:
- Gravity is pulling everything backward
- The incline shifts weight toward the rear axle
- The steeper the climb, the more the vehicle wants to rotate backward
Now add weight behind that pivot point. That weight acts like a person sitting on the back end of that seesaw. It doesn’t just add weight—it multiplies the rotational force trying to lift the front of the vehicle.
I have seen many occasions where a Bronco II was climbing a steep hill, hit a bump / obstacle, and the front tires came off of the ground. The faster they go, the further the front wheels come off of the ground. What’s happening is the suspension compresses and then rebounds (springs back). That rebound adds an upward and rearward force. The more weight you have on the back will cause weight to be removed from the front. If the front lifts too high, your center of gravity passes the rear axle “pivot point,” leading to a rearward vertical flip—often called “the flop.”
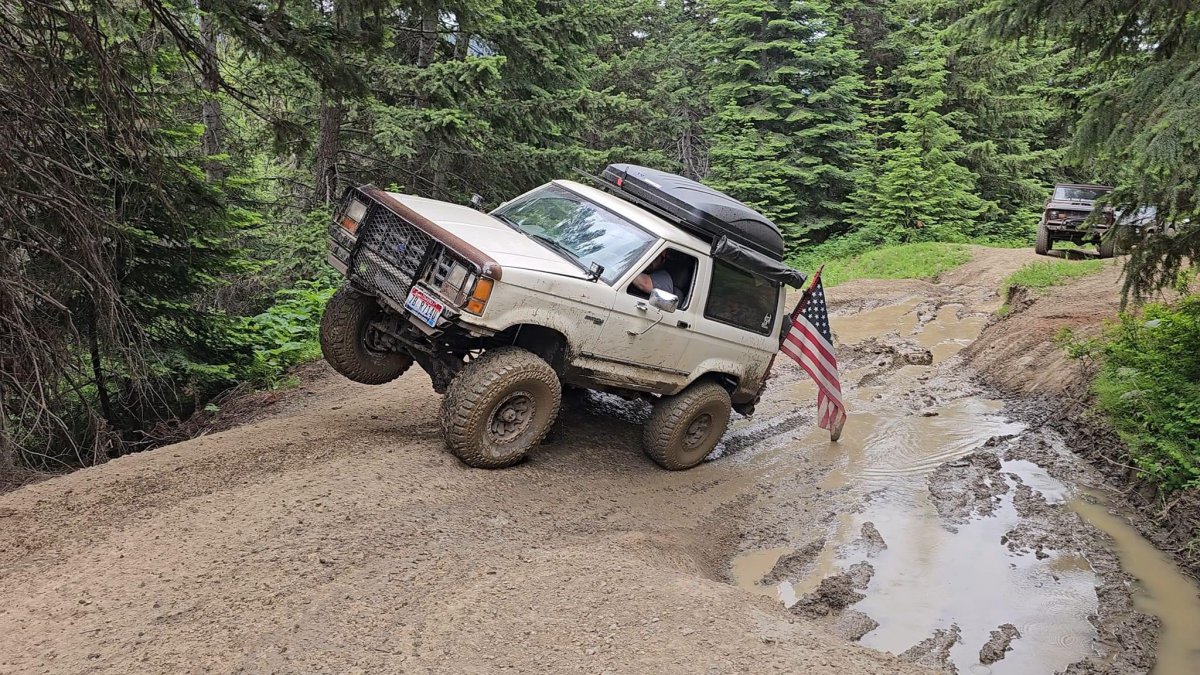
(Note all of the weight mounted to the rear and top of this Ford Bronco II)
Overloading The Vehicle
The aftermarket has figured out that “overlanding” sells, and the result is a constant push to convince people they need more gear, more storage, more accessories, and more weight hanging off their vehicle. There’s no shortage of Instagram and Facebook posts to help push those ideas. I have said on numerous occasions that the word ‘wedding’ and ‘overlanding’ automatically makes the cost go up.
This marketing push causes people to buy things they don’t need resulting in overloading the vehicle exceeding how much weight it can safely carry. Below is a photo of a Safety Compliance Sticker found on the door jamb of a 1984 Ford Bronco II 4×4.
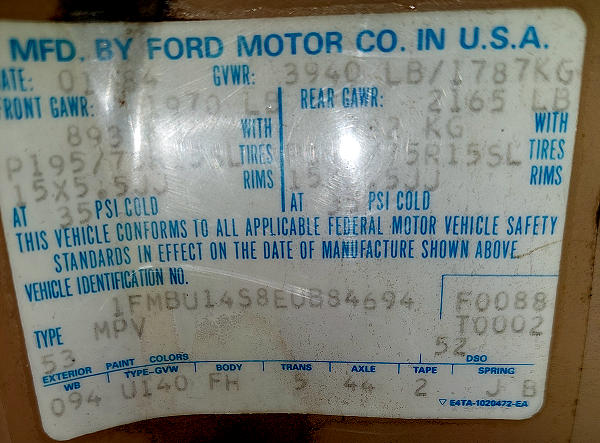
(Ford Safety Compliance Sticker)
There are some notable things to pay attention to on this sticker:
GVWR: 3940 LB – This is the total weight in pounds your Bronco II can weigh. This is the total weight including the occupants. This would be the weight of you in the vehicle parked on a scale.
FRONT GAWR: 1970 LB – This is how much weight in pounds can be placed on the axle. This would be the weight of just the front wheels on the scale.
REAR GAWR: 2165 LB – This is how much weight in pounds can be placed on the axle. This would be the weight of just the rear wheel on the scale.
The curb weight of this stock 1984 Ford Bronco ii is approximately 3,238 lbs. If this Bronco II can only weigh 3,940 lbs, then that means it has a payload capacity of 702 lbs. If you divided that amongst four passengers, it means they couldn’t weigh more than 175.50 lbs. each. But it’s highly unlikely you’re going overlanding and taking three friends along. But it does show how quickly you can reach the vehicles max GVWR.
Effects of Overloading Your Bronco II
Reduced Braking – The BII’s factory brakes were not designed to stop 4,500+ lbs of gear and armor. Overloading leads to rapid brake fade on long descents and much longer stopping distances in emergencies.
Poor Fuel Economy- You’ll see a significant drop in MPG as the small 2.9L V6 (or 2.8L) struggles to move the extra mass, requiring higher RPMs just to maintain cruising speed.
Transmission Strain – The A4LD automatic transmission common in these trucks is notorious for heat issues. Extra weight forces the torque converter to slip more, spiking fluid temperatures and leading to premature failure.
Engine Strain – Exceeding the GVWR will put more strain on the engine which could cause it to overheat, especially if you’re in the mountains and have to climb a lot of grades.
Overloaded Springs – Overloaded leaf springs lose their ability to control lateral movement. This creates a “tail wagging the dog” sensation at highway speeds, making the vehicle feel unstable in wind or when passing semis
Let’s Be Real: You Don’t Need Half the Gear You Think You Do
One of the biggest problems with modern overlanding isn’t the terrain—it’s the marketing.
As mentioned above, the aftermarket is flooded with businesses looking to get rich from the ‘overlanding’ trend. People load down their vehicles with all of that stuff and then post photos and videos on social media causing others to do the same thing. Some of those people likely got the product for free in exchange of promoting it and convincing you to buy it.
The less you take, the better the experience.
I’ve been doing this for a long time, and I’ve been gone from home for three weeks with nothing more than:
- A ground tent
- Air mattress and sleeping bag
- Folding chair
- Cooler
- Small portable grill big enough for four hamburgers
- Paper atlas to chart a direction each morning, and a cell phone.
- 5-Gallon jug of water but usually found water available at my camp sites.
I’ve lugged a 5-gallon fuel can with me but never needed it. Even doing the Trans America Trail. I just topped off my tank when I got to a town if I knew it was going to be a long stretch before I got to another town.
I’ve gone on adventures with guys that packed their bulky propane firepits, brought two 5-gallon cans of gas, and a whole bunch of other stuff ‘just in case’ they needed it but never used it, and they got less miles per gallon than I did and ran hotter climbing long grades than I did.
The key to a great adventure is being a minimalist and packing light, but many people go overboard, and I pretty much laugh at people that need a fully loaded ‘overlanding trailer’. To me, they’re not overlanding, they’re ‘overglamping’.
What Should You Take?
Obviously, there’s things you’re going to need such as:
- Cooler for food
- Food
- Utensils
- Grill or stove to cook on
- Water
- A place to sleep
- First Aid Kit
I know that seems like a pretty basic list. Let’s look at it a little closer.
Cooler – I have a Coleman thermoelectric cooler that I used to use. The kind that keeps its contents up to 40 degrees cooler than the surrounding temperature but doesn’t allow you to set a temperature. These work good inside of a vehicle, but not in a truck bed where it’s hot. I eventually got a Lifetime cooler which I really love and will actually keep ice for several days. After 10-years I finally bought an Explorer Bear 12V refrigerator, but it doesn’t carry as much as my cooler does. A cooler full of ice, food and drinks can be very heavy, so keep that in mind when packing. Since my fridge is a little smaller (and lighter) than my fully stocked cooler, I don’t keep it full of beverages. I just keep a few in there and put a new beverage in when I take one out to drink.
Grill or Stove – I love a small charcoal grill, but on my last trip I found one just like it that takes the small propane cylinder so I can use it in places that have fire bans. It functions as both my grill and stove. I cook a lot of food in foil wraps so I don’t have to deal with pots and dishes and also have a small camp griddle that I can lay on it if I want to cook and egg or make some pancakes. You don’t always need a grill AND a stove.
Utensils – This is a no brainer. Fork, spoon, knife that can cut meat, and a spatula for the griddle. Sometimes cooking tongs. I usually have some paper plates with me and a trash bag to throw everything away in.
NOTE – If you can’t dispose of your trash at your campsite, seal it in a container until you can so you don’t get any unwanted furry visitors.
Food – I actually eat better when I camp than I do at home because I’m forced to cook instead of taking something out of the freezer and sticking it in the microwave. This is where you can really get creative and shine. Some people pre-make some of their food so all they have to do is warm it up later which saves time, work, and a mess.
Water – Again a no brainer. Especially of you disperse camp. If I’m gone for a while I can usually find a campground with a water spigot to refill my water jug.
A Place to Sleep – I have slept in the back of a SUV, the front seat of my truck, in a roof top tent, and a ground tent. I’ve slept in a sleeping bag on the ground, on an air mattress, and on a cot. My preferred setup is my Rapid Tent ground tent and a Coleman Trailhead II cot. The Rapid Tent goes up in about 4-minutes, doesn’t take up a lot of space when packed away, and is a LOT lighter than a roof top tent. It also gives me the freedom to camp where I want and not limited to where I can park. This is especially nice if you’re camping in a state of national forest campground. I’ve been on a trip where we camped in a national forest campground and a couple of us had ground tents and camped under the large trees, and a couple had roof top tents and were stuck camping out in the open where the parking spaces were. In the middle of the night the winds picked up, and it was much rougher for those out in the open and up off the ground than it was for us in ground tents shielded by the trees.
First Aid Kit – I added a first aid kit to the list because you never know when you’re going to need it. Especially when you’re outdoors. I actually keep a first aid kit in my house and every vehicle that I own.
Setting Up A Bronco II For Overlanding
Reliability
Reliability is the most important thing to consider when modifying your Ford Bronco II. The closer it is to stock, the more reliable it will be. That V8 swap might be cool until it starts puking engine coolant crossing a desert or climbing mountains.
Less Can Be More
I’ve seen people overload their trucks with gear that killed their gas mileage, caused the engine to run hot climbing long grades, and put a lot of strain on the drivetrain and brakes (See ‘Overloading The Vehicle’ above). Heavy duty bumpers, winches, refrigerators, and gas and water cans all deduct from the payload capacity.
Building For Of f-Road
If you’re going to do any serious overlanding, then you’re going to find yourself on some rough roads and trails that may or may not be maintained. I’ve been on forest roads that were more like difficult trails at an off-road park, encountered numerous water crossings, muddy ruts, and even snow in the summer at high elevations. A good overlanding vehicle should be capable of moderate off-roading. Most importantly, know the limitations of you and your vehicle.
Instead of suggesting how to build for off-road, I suggest you check out: Ford Bronco II Builders Guide
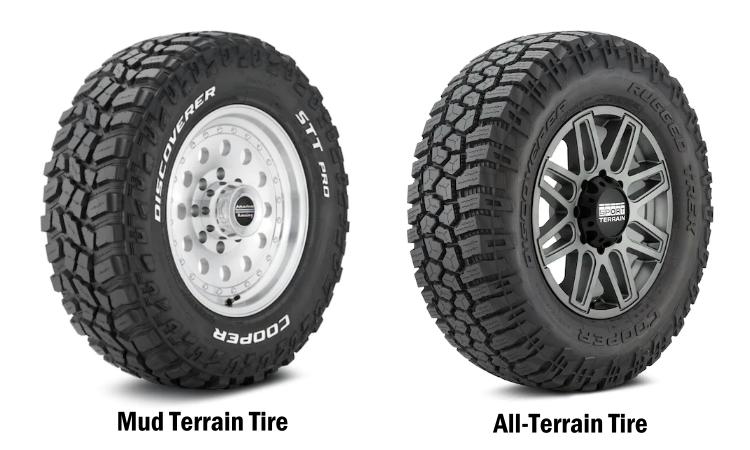
Tires
A good tire is important to make sure that your Bronco II can get traction on unmaintained roads or trails. I suggest either a good set of all terrain or mud terrain tires. You’ll get more mileage out of a good all terrain than a mud terrain. Many manufacturers now offer a ‘Rugged Terrain’ which is a more aggressive all terrain. Make sure you have a matching full-size spare and a good lug wrench and jack capable of lifting the truck high enough to get the wheel off of the ground.
Air Compressor / Tire Repair
Speaking of tires, it’s a good idea to have an air compressor or compressed air tank to air your tires up if you aired them down for a rough trail. They’re also nice for inflating air mattresses and blowing the dust out of your air filters after a long day on dusty roads. I personally carry a Smittybilt 5.65 CFM Portable Air Compressor. A tire repair kit is another great thing to have so you can plug a hole in your tire along the trail.
Electrical
Upgrade your Bronco II electrical system with a 130 Amp Alternator Upgrade and an AGM Group 65 battery. Make sure your Bronco II came with a Group 65 battery tray to fit the 12.1″ x 7.5″ x 7.6″ battery. You’ll want the increased power output and AGM battery to power your accessories such as a winch, GMRS radio, off-road lights, tablet / GPS, cameras, and 12V refrigerator. A portable power station like a Jackery 300 or 500 is a great way to keep your 12V fridge running while camping if you don’t want to run it off your vehicle battery.
Recovery Gear
You should always be prepared for the possibility that you could get stuck somewhere. This means having frame mounted tow hooks on the front AND rear of your Bronco II for someone to connect a tow strap, recovery rope, or winch cable to. With that said, make sure you also have a 20,000 lb. or 30,000 lb. tow strap and two shackles with a Working Load Limit (WLL) that is at least 1.5 to 2 times your vehicle’s Gross Vehicle Weight Rating (GVWR). Don’t expect the person that’s going to rescue you to have an appropriate tow strap and shackles. Traction boards are a good tool to carry as well. A winch is a great investment especially if you’re traveling alone. A Ford Bronco II will need at least an 8,000 lb. winch. I’ve used a Smittybilt 9.5K Winch for years and it’s affordable. Don’t overlook a Hi-Lift Jack. A Hi-Lift jack can not only get you up and over an obstacle but can also function as a hand winch as well. Check out: Winching With A HiLift Jack.
Check out: Choosing A Winch, Recovery Gear, and Recovery Points
Roof Rack
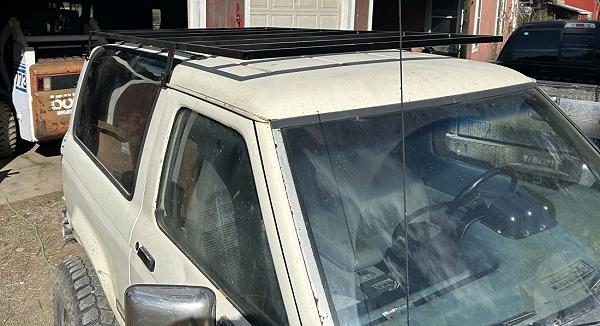
I’m not a fan of placing any weight on the roof of the Bronco II. The short wheelbase, narrow track width and high center of gravity puts it at risk of rolling over. Putting a lot of weight on the roof can magnify that risk. However, I understand that it’s tempting to use that space since there’s limited interior space. I would never put a roof top tent up there, but it is a good place to put a pair of traction boards and maybe a pair of Apache rifle cases for storage. It might even be tempted to put my ground tent up there, but I wouldn’t just put it up there in its canvas bag. I’d make sure it was in something that would protect it from tree branches. I would make sure that the rack was big enough and strong enough to support what you’re going to put on it without going overboard. You don’t necessarily need a basket. You just need something to anchor things to.
I found this first homemade roof rack interesting with the rear support that runs down to the quarter panel.
Roof Top Tent or Ground Tent
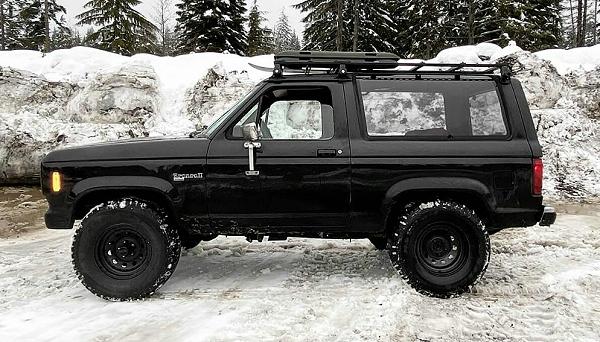
Roof Top Tent
A roof top tent is great for setting up camp quickly at the end of a long journey. You don’t have to worry about finding a place to set up your tent that’s flat, dry, and free of sticks and rocks, and you’re up off of the ground if it rains. You’re also up off the ground from animals, rodents, and snakes.
The downside is that a roof top tent weighs over 100 lbs., makes the Bronco II more prone to rolling over, and you can only set it up where you can legally park.
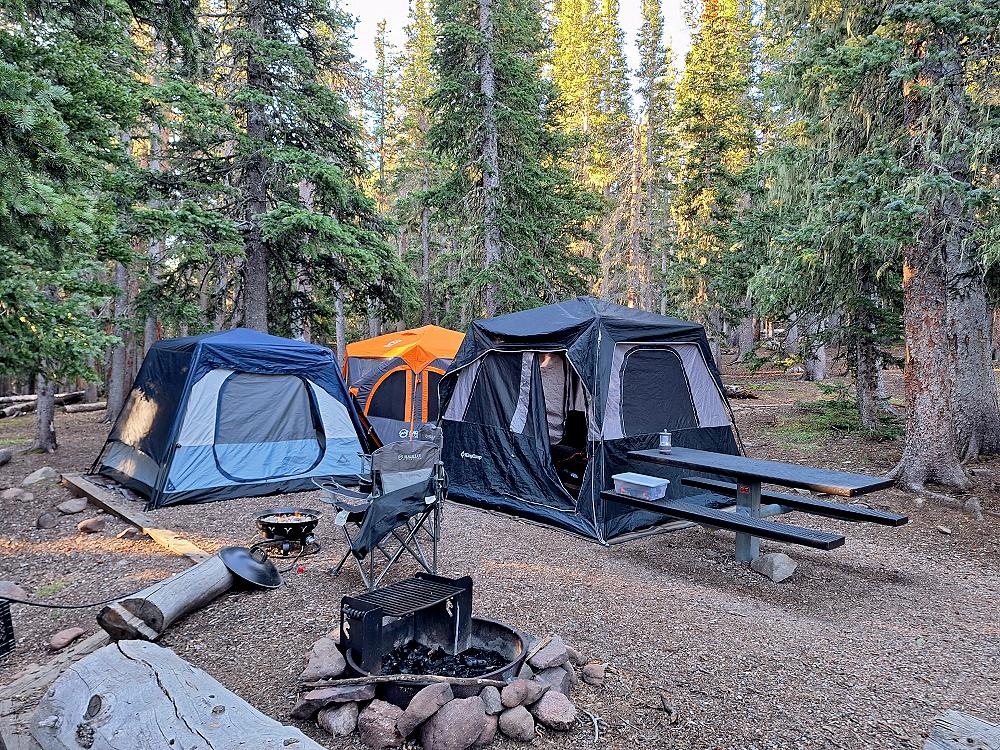
Ground Tent
A ground tent will allow you to set up a base camp and still leave your vehicle free to go off and explore in. It also gives you more control over where you camp. On our Colorado trip, a few of us had ground tents and some had roof top tents. Those with roof top tents had to park is designated parking areas in some of the National Forest campgrounds. Those with tents were camped under the trees. Strong winds came through in the middle of the night and the trees helped break up the winds. Trees can also act as an umbrella. Those with roof top tents were in open spaces unprotected by the trees and took the brunt of those winds.
The Gazelle T4 has become a very popular tent. It’s a rugged tent with built in poles that allows you to put it up and take it down quickly. It has a 210 denier Oxford weave polyester shell and a 300 denier Oxford weave polyester floor. It’s 94″ x 94″ x 78″ tall setup, but it’s 67.5″ long when packed up. It has a packed weight of 30 lbs.
I personally use a Caddis RapidTent. It has a 190-denier polyester shell with a 210-denier polyester floor and is 96″ x 96″ x 72″ setup but only 50″ long when packed up. It has a packed weight of 20 lbs. 8 oz. My concern was the amount of space the Gazelle T4 tent was going to take up in my bed and that it was going to be too long to fit in the basket on my bed rack.
Another point of consideration as that the Gazelle and RapidTent are $300.00 tents where a good roof top tent is going to cost you over $1,000.00. Don’t be discouraged though. If you check your local Facebook marketplace, you’ll likely find some used roof top tents for sale. I’ve seen people sell lightly used ones for as little as $650.00.
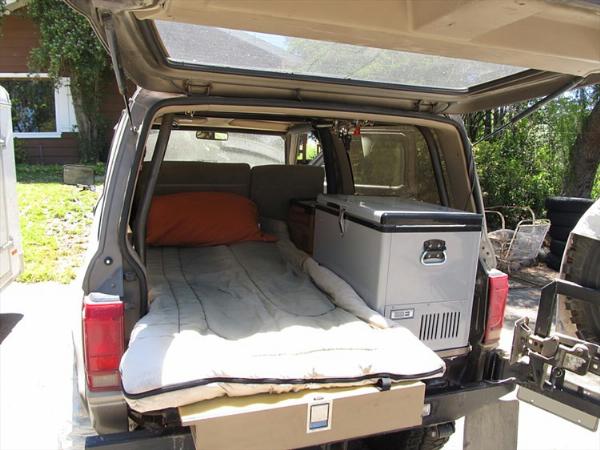
Sleeping In The Bronco II
I don’t know anyone that has travelled to remote areas and camped in a Bronco II more than ‘4x4Junkie’. 4x4Junkie’s 1990 Ford Bronco II is a very well-built adventure rig and is setup with a platform in the rear to sleep on. Check out: 4x4Junkie’s 1990 Ford Bronco II 4×4
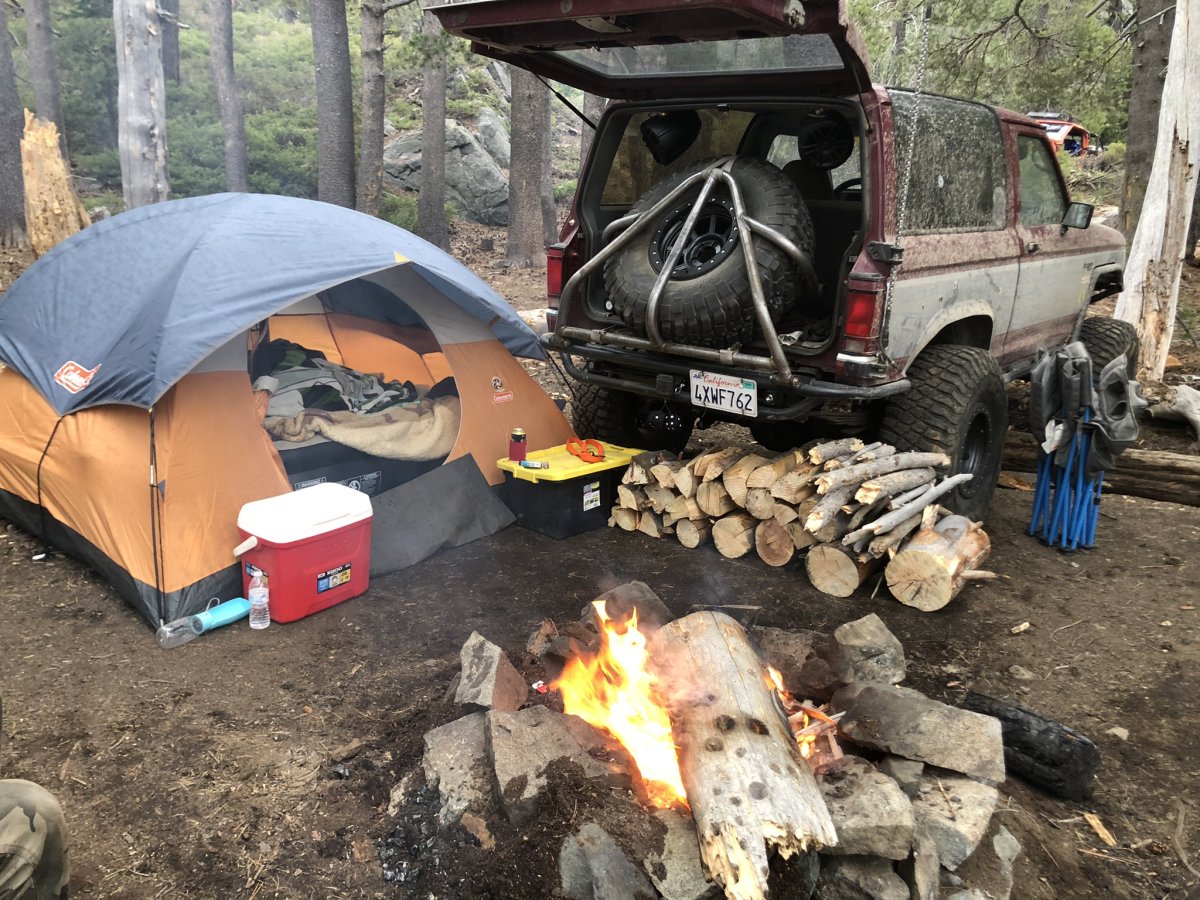
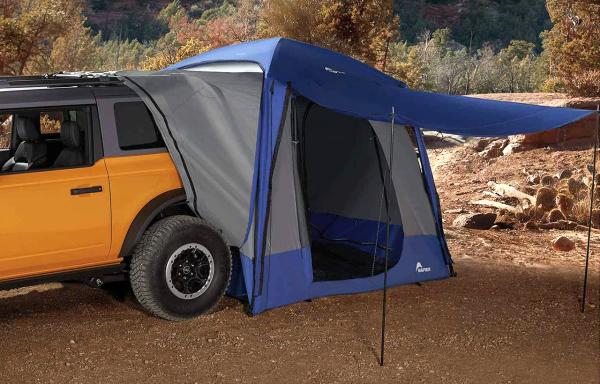
SUV Tent
Companies such as Napier make a tent that can enclose the back of your Ford Bronco II that covers the open hatch and allows you to access the vehicle from the tent.
Custom Tent
On this ‘Doomsday Prepper Bronco II’, a custom tent enclosure was made that attaches to the rear hatch and uses the hatch as the tents roof. A floor is attached to the rear hitch receiver to allow for more room. A self-inflating air mattress is also used.


How Would I build It?
If I was building a Bronco II for overlanding, I would build one of these two setups:
Setup #1
This would be a budget friendly build. I chose the 2.9L for its fuel injection and increase in horsepower of the 2.8L, and the manual since it has better gearing and is more reliable than the A4LD automatic. I’d create enough room to fit 31-inch tires, focus on reliability, pack light, and enjoy the adventure. The stock Dana 28 front axle will hold up to 31-inch tires and a V6.
- 1986-1988 Ford Bronco II 4×4
- 2.9L V6 / Manual Transmission
- 2-inch Suspension Lift & Fender Trimming
- 31-inch Maxxis Razr AT All Terrain Tires
- Manual Locking Hubs
- Rear Lock-Right Locker (If the rear 7.5 is an open differential)
- GMRS 2-Way Radio
- Lifetime Cooler
- Rapid Tent Ground Tent (Keep your weight / center of gravity low)
- Hi-Lift Jack For Recovery
Setup #2
This is a more serious build. I’d swap in the 4.0L OHV V6, Dana 35, and Ford 8.8 from a Ford Ranger. I’d be fine using a 28-spline rear 8.8 axle, but a 31-spline would obvious be better. Shoot for a 1996-1997 Ford Ranger. It will have better front brakes and a better automatic transmission than the A4LD. I’d prefer to not have to mess with a clutch if I have a choice of a stronger automatic. Definitely go with the Skyjacker Suspension 4-inch lift with longer radius arms to keep all four tires planted on the ground and trim the fenders or get some cut-out fender flares to fit 33-inch tires. The Cooper Rugged Trek is an aggressive all-terrain tire, comes with a tread warranty, and will outlast mud-terrains. Put a locker in the front and add an air locker to the rear if you don’t already have a limited slip. A limited slip will work fine in an overlanding rig.
- 1986-1988 Ford Bronco II 4×4
- 4.0L OHV V6 Swap & Automatic Transmission
- Dana 35 / Ford 8.8 Axle Swap
- Lock Right Front Locker (Dana 35)
- Rear Selectable Air Locker (Ford 8.8)
- 4.56 Gears
- Skyjacker Class II 4-Inch Suspension Lift With Extended Radius Arms
- 33×12.50×15 Cooper Discoverer Rugged Trek All-Terrain Tires (Trim The Fenders)
- GMRS 2-Way Radio
- 12V Electric Fridge (Upgrade your battery to support the added draw of the fridge)
- Rapid Tent Ground Tent (Keep your weight / center of gravity low)
- 9,500 LB. Winch On Grill Guard / Winch Bumper
Related Articles
About The Author
Jim Oaks is a longtime Ford truck and SUV enthusiast and the founder of The Ranger Station and Bronco II Corral. With decades of hands-on experience, he writes both technical and non-technical articles covering the Ford Bronco II, including mechanical systems, factory engineering, common upgrades, and detailed feature vehicle write-ups.
In addition to technical content, Jim documents Bronco II history, rare factory and aftermarket models, production details, and original Ford marketing materials. His work is based on firsthand experience, original documentation, and long-term involvement in the Ford enthusiast community.
Through his sites, Jim has built comprehensive reference libraries that serve owners, builders, restorers, collectors, and historians, helping preserve the Bronco II’s technical knowledge and historical significance.