Introduction
I found myself taking on a 1984 Ford Bronco II 4×4 project that would be a first vehicle for a 16-year-old that just got his license. There wasn’t money for an expensive paint job, and I wanted the vehicle to look good on a low budget, so I decided to do a Rust-Oleum paint job. I had heard of people painting vehicles with Rusto-Oleum, but I had never done it. I had always used normal automotive paint when painting a vehicle. People have applied the paint with foam rollers, and others have sprayed it. For this project, I decided to spray it. The new owner really liked black vehicles, and for those of you that don’t know, black will show every flaw. So doing a low budget black paint job is a gamble. Here’s how I did it.

What You’ll Need
Materials
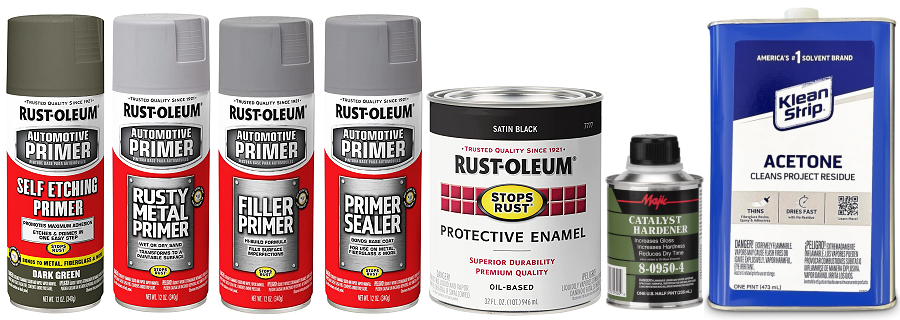
- Rust-Oleum Protective Enamel (oil-based, NOT water-based)
- Acetone (pure, not nail polish remover)
- Enamel hardener (Majic, Valspar, or equivalent)
- Automotive primer (etching for bare metal, filler primer for bodywork)
- Wax & grease remover (or acetone for final wipe)
- Sandpaper: 80, 180, 320, 400, 600, 1000–2000 grit
- Clean mixing cups & strainers
- Respirator rated for organic vapors
- Nitrile gloves
Equipment
- HVLP spray gun
- Air compressor with moisture trap
- Clean, dust-controlled space (garage works)
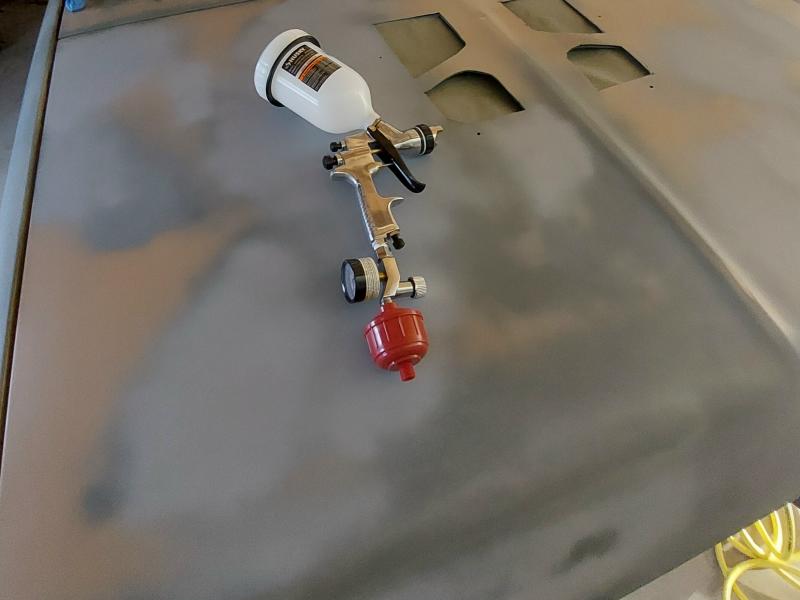
I will be painting the vehicle with a Husky HVLP paint gun that I got from Home Depot.
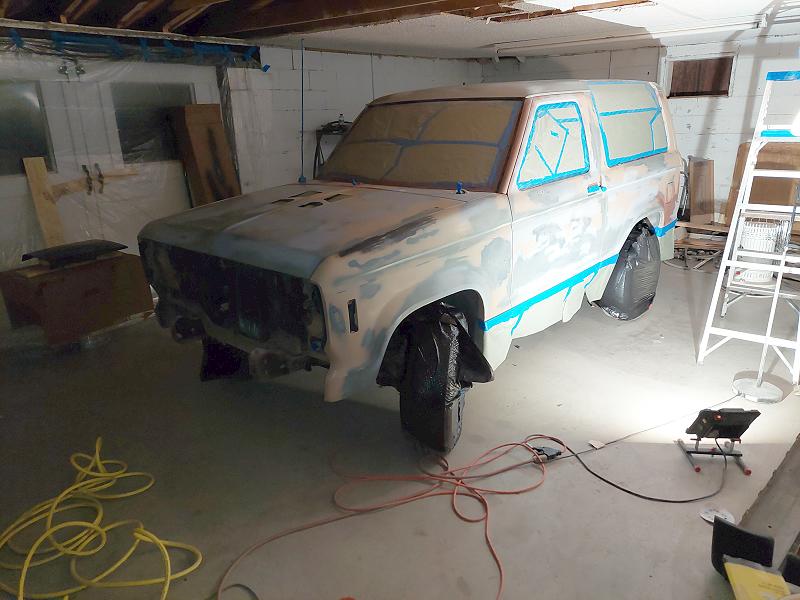
Prepping For Paint
I washed the truck with Dawn dish soap and then brought it into the shop.
I removed the bumpers, grill, lights and all of the trim except for the XLS moldings along the sides. I was concerned that I would damage the molding. Especially since it seems to have an adhesive holding it place. And since it’s in good shape and not loose, why take the chance.
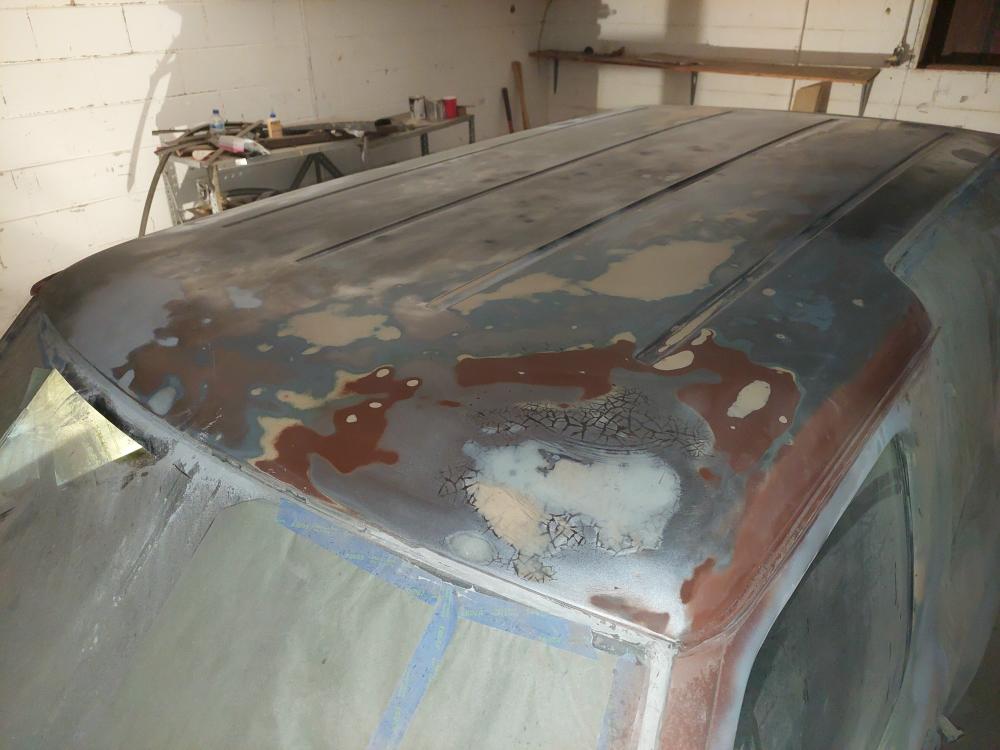
The rusty areas were sanded down with 180-grit sandpaper. I fixed the more noticeable dents with Bondo, but not all of them.
I used 220-grit and then 320-grit to sand down any rough areas and to feather the paint and bare metal so it all blends.
I had to use a wire wheel to get the seam sealer out of the drip rails above the doors and remove the rust that was under them. They got a coating of rust convertor before getting a now coat of seam sealer.
I used rusty metal primer on a few bare metal spots that still had dark areas in the metal after I sanded them, and self-etching primer on all other bare metal areas. I used filler primer over the sections that either had minor imperfections or Bondo work.
I went over the whole vehicle with a 360-grit scuff pad to make sure that the new paint would have a surface to bite to.
Finally, I wiped the vehicle down with wax and grease remover.
I covered the windows and the XLS molding with masking paper. DO NOT use newspaper. Paint can soak through newspaper. I covered the wheels and tires with some plastic yard trash bags.

Painting The Vehicle
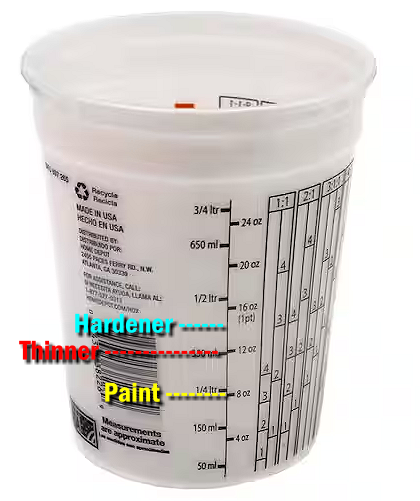
Mixing the Rust-Oleum
I mixed the paint, acetone and hardener in an 8:4:1 Ratio.
- 8 parts Rust-Oleum paint
- 4 parts acetone
- 1 part hardener
Example:
- 16 oz paint
- 8 oz acetone
- 2 oz hardener
Notes
- Mix paint + acetone FIRST
- Add hardener LAST
- Strain into the gun
- Pot life with hardener: ~6–8 hours
If it sprays dry or orange-peels → add a tiny bit more acetone.
Spray Settings
- PSI at gun: 20–30 psi
- Fan: medium-wide
- Distance: 6–8 inches
- Overlap: 50%
Do a test spray on cardboard. You want it to flow, not mist.
Application
- Strain the mixture through a fine filter into your HVLP spray gun.
- Apply 2–3 light, even coats, waiting about 15–30 minutes (or until tacky) between coats.
- Hold the gun 10–16 inches from the surface and overlap each stroke by 50%.
Cure Time
With Hardener
- Dust-free: ~2 hours
- Handle: 12–24 hours
- Sand/buff: 48–72 hours
Without Hardener:
- Handle: 2–3 days
- Full cure: 2–4 weeks
- Avoid rain for at least 24 hours.
Finishing and Curing
- Sanding Imperfections: If you notice “orange peel” texture, wet sand with 600 to 800-grit sandpaper between coats or after the final coat.
- Curing: Let the paint fully cure for at least 48 hours to a week before buffing or waxing.
- Polishing: Once cured, you can use a cutting compound followed by a carnauba wax to bring out a high gloss.
Putting It All Back Together
Painting The Moldings and Trim
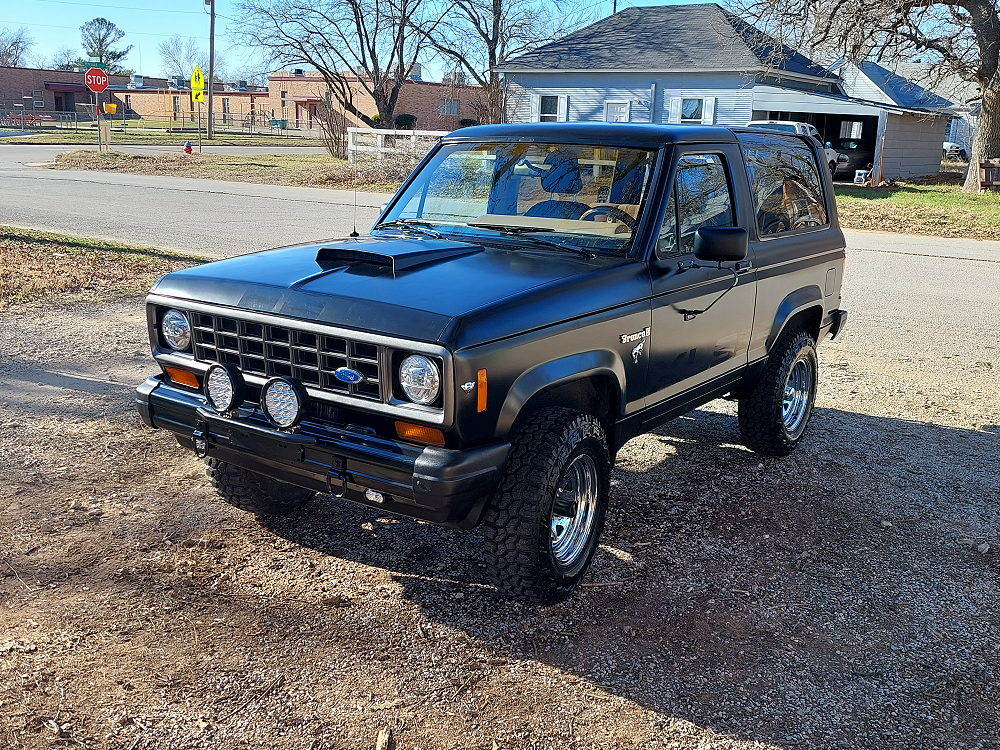
The XLS moldings were a plastic rubber type of material, so I chose to not paint them when I painted the vehicle because I didn’t know how well the paint would adhere to them. After the paint had cured for a day or two, I masked above the moldings and painted them with Krylon Fusion Satin Black. I could have used Rust-Oleum Painter’s Touch 2X Satin Black, but I already had the Krylon.
I also painted the plastic end pieces for the bumpers (I removed them) and all of the trim that I removed from around the windows satin black as well.
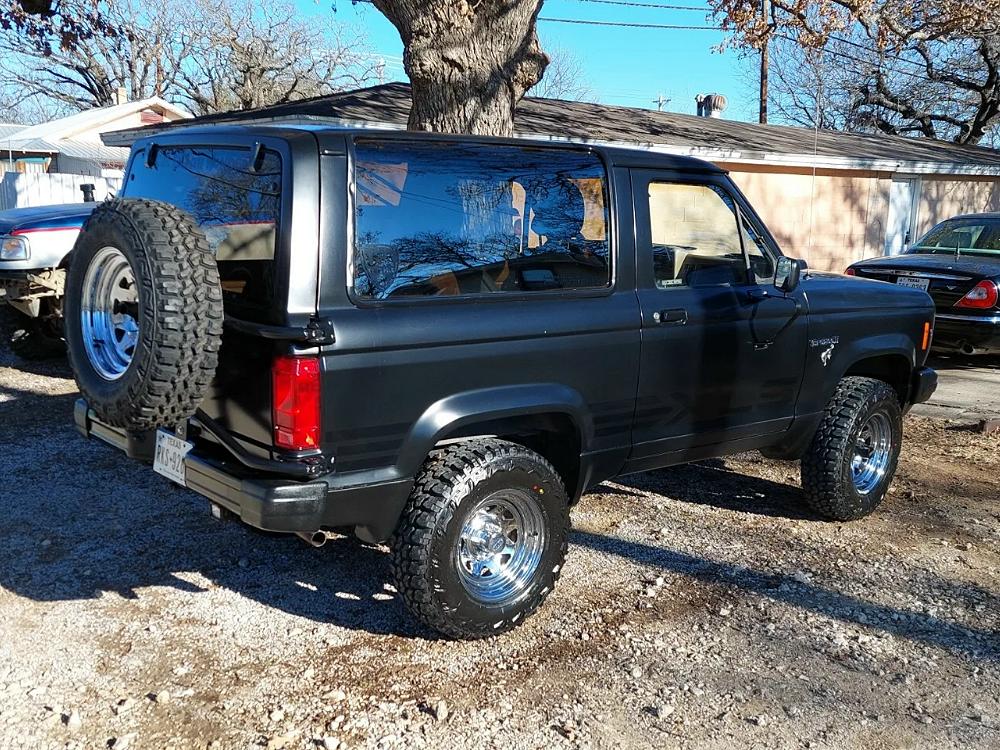
Painting The Bumpers, and Tire Carrier
The bumpers and tire carrier were repainted with Rust-Oleum High Performance Enamel Gloss Black.
Stripes and Emblems
I bought some new Bronco II and Ford emblems and used a vinyl cutter to make new gloss black XLS stripes to go down the side of the vehicle. They’re hard to see in the photos but look great in person. I also added a hood scoop and a set of glass black racing stripes that go up to it.

Interested in the round headlight conversion? Check out: Round Headlights On Your Bronco II
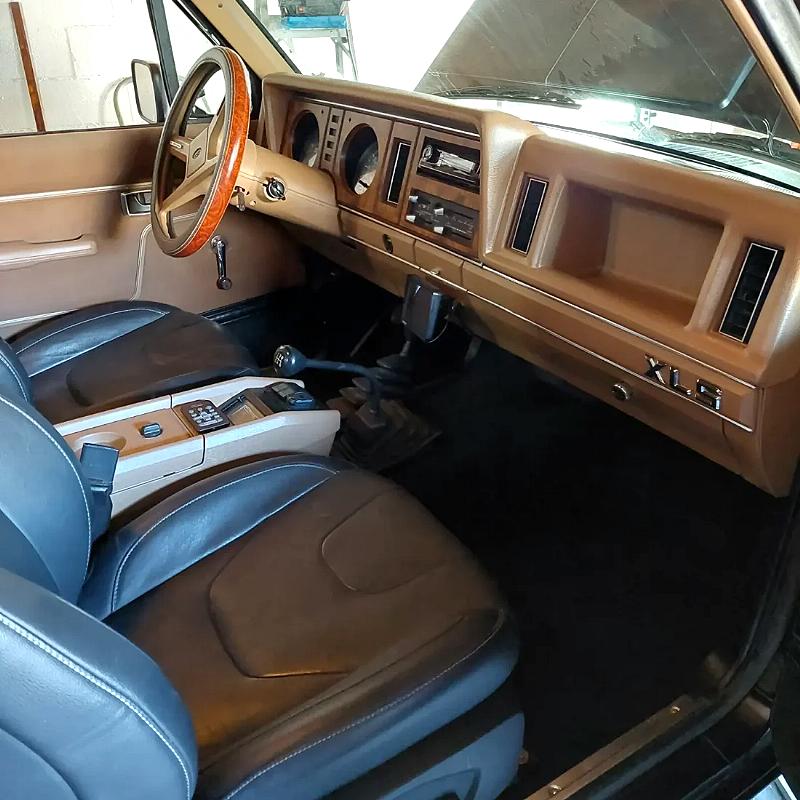
Painting The Interior
I wasn’t trying to make this a ‘Rust-Oleum’ build, but I ended up completely redoing the interior and painting the dash, console, and all of the panels with Rust-Oleum Painter Touch Satin Nutmeg because it was an almost exact match to the original interior color.
Products Used
Rust-Oleum Satin Black – 2 Quarts
Rust-Oleum Self-Etching Primer
Rust-Oleum High Performance Enamel Gloss Black
About The Author
Jim Oaks is a longtime Ford truck and SUV enthusiast and the founder of The Ranger Station and Bronco II Corral. With decades of hands-on experience, he writes both technical and non-technical articles covering the Ford Bronco II, including mechanical systems, factory engineering, common upgrades, and detailed feature vehicle write-ups.
In addition to technical content, Jim documents Bronco II history, rare factory and aftermarket models, production details, and original Ford marketing materials. His work is based on firsthand experience, original documentation, and long-term involvement in the Ford enthusiast community.
Through his sites, Jim has built comprehensive reference libraries that serve owners, builders, restorers, collectors, and historians, helping preserve the Bronco II’s technical knowledge and historical significance.